Home Lab - VPN
Since our lab is isolated from the home network behind the router we need a way to access the VM's inside from our research systems. To access the systems behind the router we can use a VPN. With VyOS we have 2 options:
- L2TP/IPSec - Native support on Windows and OS X. Linux client support can be tricky.
- OpenVPN - Requires third party client installed, works well on Windows, OS X and Linux.
Depending on your client machine the type of VPN solution will vary. In the case of Windows and OS X L2TP/IPSec works very well in my experience. When developing my tools on Linux, OpenVPN tends to be more stable.
Configuring L2TP/IPSec VyOS
We start configuring L2TP/IPSec by first changing to configuration mode after logging in to the router and specifying the interface we will use for IPSec connections. In addition to this I configured NAT Traversal, this step is not required it is only in the case one VM inside the network wants to VPN in to another environment.
set vpn ipsec ipsec-interfaces interface eth0
set vpn ipsec nat-traversal enable
set vpn ipsec nat-networks allowed-network 10.101.0.0/16
Now we start configuring L2TP settings, we start by creating an account that we will use for authentication. If you use special character make sure to enclose the password between quotes.
set vpn l2tp remote-access authentication local-users username labuser password 1abPass01
The next step is to create a pool of IP addresses that will be used by VPN clients when they connect and the DNS server they will use. When we setup Active Directory we have to go back and modify the dns-servers configuration block.
# Set L2TP Client IP Pool for VPN
set vpn l2tp remote-access client-ip-pool start '10.101.101.10'
set vpn l2tp remote-access client-ip-pool stop '10.101.101.14'
set vpn l2tp remote-access dns-servers server-1 10.101.101.1
We configure the L2TP authentication method and pre-shared secret IPSec settings. We ensure that we validate against the local user we created and we specify what is the external IP address and next hop of our external interface.
set vpn l2tp remote-access ipsec-settings authentication mode pre-shared-secret
set vpn l2tp remote-access ipsec-settings authentication pre-shared-secret 'My$secret'
set vpn l2tp remote-access authentication mode local
set vpn l2tp remote-access outside-address 192.168.1.9
set vpn l2tp remote-access outside-nexthop 192.168.1.1

commit
save
After running commit and save we now need to open the proper ports in the firewall from the outside to the external interface. We open UDP 500 for IKE and we allow Encapsulating Security Payload (ESP) traffic.
# Allow IKE and ESP traffic for IPsec:
set firewall name OUTSIDE-LOCAL rule 100 action 'accept'
set firewall name OUTSIDE-LOCAL rule 100 destination port '500'
set firewall name OUTSIDE-LOCAL rule 100 protocol 'udp'
set firewall name OUTSIDE-LOCAL rule 200 action 'accept'
set firewall name OUTSIDE-LOCAL rule 200 protocol 'esp'
Now we open the port for L2TP over IPSEC and we ensure that the protocol is IPSec.
# Allow L2TP over IPsec
set firewall name OUTSIDE-LOCAL rule 210 action 'accept'
set firewall name OUTSIDE-LOCAL rule 210 destination port '1701'
set firewall name OUTSIDE-LOCAL rule 210 ipsec 'match-ipsec'
set firewall name OUTSIDE-LOCAL rule 210 protocol 'udp'
We also add a rule for NAT traversal traffic.
# Allow NAT traversal of IPsec:
set firewall name OUTSIDE-LOCAL rule 250 action 'accept'
set firewall name OUTSIDE-LOCAL rule 250 destination port '4500'
set firewall name OUTSIDE-LOCAL rule 250 protocol 'udp'
Once all rules are created we only need to commit and save to have the settings and ports open.
commit
save
Configuring IPSec VPN on Windows
On Windows 10 it only takes one single PowerShell cmdlet to create the VPN connection. To create the connection we use Add-VpnConnection cmdlet with the following parameters:
- Name - Nave for the connection.
- ServerAddress - IP address or FQDN of the VPN server.
- TunnelType - we specify L2TP
- RememberCredentials - we pass the booles $true so it will remember the credentials used.
- L2tpPsk - The IPSec pre-shared secret.
- AuthenticationMethod - We specify a supported authentication method, in this case we specify MSChapv2.
- EncryptionLevel - we set the encryption level to Maximum.
- Forece - this will suppress the warning that the L2TP tunnel is not encrypted with a certificate.
- PassThru - this parameter will show the resulting connection and the parameter with which it is configured.
Add-VpnConnection -Name LAB1 -ServerAddress 192.168.1.9 -TunnelType L2tp -RememberCredential $true -L2tpPsk 'My$secret' -AuthenticationMethod MSChapv2 -EncryptionLevel Maximum -force -PassThru
Configuring IPSec VPN on OS X
- Choose Apple menu > System Preferences, then click Network.
- Click Add at the bottom of the network connection services list, click the Interface pop-up menu, then choose VPN and the VPN Type L2TP over IPSec.
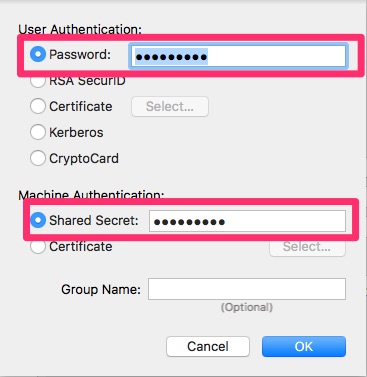
- Enter the IP Address if the external interface of the lab router and the username of the account configured.
- Click on Authentication Settings and enter the password for the use and under Machine Authentication enter the shared secret entered in the configuration.
- Click Ok and the main Network preference pane click on the gear under the list of connection and select Set Service Order.
Configuring OpenVPN on VyOS
Lets take a look at configuring OpenVPN. As mentioned earlier in my experience when working from a Linux development machine OpenVPN has been an easier and more stable VPN solution for my development needs.
OpenVPN is a SSL/TLS based VPN solution and as such we need to use a CA for generating and signing our certificates for use. Since this will be used in a home lab environment there is no need to build a proper CA infrastructure so in this post I will cover using the easy-rsa2 scripts that OpenVPN provides. Also since this is a home lab environment I will generate the keys in the router it self, in a real production environment this should not be done but generated in a secure machine and proper accounting of all keys generated and revocation must be maintained.
We will start by copying the easy-rsa version 2.0 folder from the OpenVPN examples directory from its documentation in to the config directory on the router and set the proper variables for the generation of our certificates.
cp -pr /usr/share/doc/openvpn/examples/easy-rsa/2.0/ /config/easy-rsa2
nano /config/easy-rsa2/vars
I increased the size for my Diffie-Helman key to 2048, you can put 4096 for it but it will take a very long time to generate the key. 2048 for a lab is a good compromise given that it is a home lab and not production

Once the modifications to the file are saved we will source the variables so they are set as the defaults for when we generate the certificates.
cd /config/easy-rsa2/
source ./vars
We run the clean-all script to make sure the environment is properly set for key generation.
./clean-all
We now start by building the CA root certificate using the build-ca script.
./build-ca
We now generate the Diffie-Hellman certificate in PEM format using the build-dh script.
./build-dh
We now generate the keys for our router using the build-key-server script and we give it the name of the router.
./build-key-server R0
once the keys are generated we can copy our certificates to the proper location for use by OpenVPN in the /config/auth directory.
sudo cp /config/easy-rsa2/keys/ca.crt /config/auth/
sudo cp /config/easy-rsa2/keys/dh2048.pem /config/auth/
sudo cp /config/easy-rsa2/keys/R0.key /config/auth/
sudo cp /config/easy-rsa2/keys/R0.crt /config/auth/
The router section is now done and we will proceed to create and sign the certificates that will be used by the user to authenticate to the router.
./build-key labuser
We will now create single configuration file that can be used by most OpenVPN clients.
echo "client" >> labuser.ovpn
echo "proto udp" >> labuser.ovpn
echo "remote-cert-tls server" >> labuser.ovpn
echo "verb 2" >> labuser.ovpn
echo "dev tun0" >> labuser.ovpn
echo "remote 192.168.1.9 1194" >> labuser.ovpn
echo "<ca>" >> labuser.ovpn
cat /config/easy-rsa2/keys/ca.crt >> labuser.ovpn
echo "</ca>" >> labuser.ovpn
echo "<cert>" >> labuser.ovpn
cat /config/easy-rsa2/keys/labuser.crt >> labuser.ovpn
echo "</cert>" >> labuser.ovpn
echo "<key>" >> labuser.ovpn
cat /config/easy-rsa2/keys/labuser.key >> labuser.ovpn
echo "</key>" >> labuser.ovpn
Once the file is created you can use SCP to copy the file to your machine for use with the OpenVPN client of choice for the platform being used.
We now need to configure the VPN service by creatine a tun interface and specify the certificates it will use including the settings it will pass to the machines that connect so they can interact with the services behind the router..
set interfaces openvpn vtun0 mode server
set interfaces openvpn vtun0 server subnet 10.101.100.0/24
set interfaces openvpn vtun0 server name-server 10.101.101.1
set interfaces openvpn vtun0 server domain-name 'acmelabs.pvt'
set interfaces openvpn vtun0 server push-route 10.101.0.0/16
set service dns forwarding listen-on vtun0
set interfaces openvpn vtun0 tls cert-file /config/auth/R0.crt
set interfaces openvpn vtun0 tls key-file /config/auth/R0.key
set interfaces openvpn vtun0 tls ca-cert-file /config/auth/ca.crt
set interfaces openvpn vtun0 tls dh-file /config/auth/dh2048.pem
The last step is to open the ports in the firewall so clients can connect and commit and save the configuration.
# Allow OpenVPN Connection
set firewall name OUTSIDE-LOCAL rule 50 action 'accept'
set firewall name OUTSIDE-LOCAL rule 50 destination port '1194'
set firewall name OUTSIDE-LOCAL rule 50 protocol 'udp'

commit
save
I will let the configuration part of the client to the reader since there are multiple clients that can be used per platform, in Linux there are several UI interfaces that can be used depending on the desktop used.