PowerShell Basics - Execution Policy and Code Signing Part 1

One will see in many places in Microsoft documentation and in several books out there that PowerShell has security system called Execution Policy, I personally do not agree this is a security measure but just a simple control to protect from accidental execution of code not specifically allowed thru normal means. First lets cover what are the security minded default configurations that PowerShell has:

  • It does not execute scripts by double clicking on them by default.
  • All scripts must be digitally signed with a trusted digital certificate by the host system so as to be able to execute.
  • All script when executed in a PowerShell session must be executed by providing the path of the script wither relative or full they cannot be executed just by name.
  • Code is executed under the context of the user.
  • Code that is downloaded via a web browser or thru emails clients that mark the file as downloaded from the Internet in the file meta-data the file will blocked from execution unless specifically allowed.
These defaults settings provide the following protections:
  • Control of Execution - Control the level of trust for executing scripts.
  • Command Highjack - Prevent injection of commands in my path.
  • Identity - Is the script created and signed by a developer I trust and/or a signed with a certificate from a Certificate Authority I trust.
  • Integrity - Scripts cannot be modified by malware or malicious user.
Microsoft took great care and attention to minimize the attack surface of PowerShell when an attacker tries to trick a user in to executing a possibly malicious script. Once on the system things change since these controls cannot protect from:
  • Copy pasting the content of the script in to PowerShell.
  • Encoding the script in Base64 and running it from the command line as an argument to the powershell.exe
  • Enter each command by hand and execute it.
Sadly PowerShell does not provide a way to block specific cmdlets or .NET APIs from users to do a more fine grained control on system. This allows say malware already present on the system or an attacker that has been able to get a foothold on the system to leverage PowerShell. An example of this is the first known use of Powershell Code as Malware in the wild http://nakedsecurity.sophos.com/2013/03/05/russian-ransomware-windows-powershell/ in addition to this PowerShell has also been added to what I call dual purpose tools like Metasploit and Social Engineering Toolkit that are written primarily for Penetration testers and researchers but sadly can also be used by a malicious attacker does why I refer to them as dual purpose tools.

Changing Execution Policy

To control the validation of scripts and cmdlets that be use the Set-ExecutionPolicy cmdlet is used. There are several Policies that can be used:
  • Restricted No Script either local, remote or downloaded can be executed on the system.
  • AllSigned All script that are ran require to be digitally signed.
  • RemoteSigned All remote scripts (UNC) or downloaded need to be signed.
  • Unrestricted No signature for any type of script is required.
Each of these policies can be applied to different scopes to control who is affected by them, the scopes are:
  • MachinePolicy: The execution policy set by a Group Policy for all users.
  • UserPolicy: The execution policy set by a Group Policy for the current user.
  • Process: The execution policy that is set for the current Windows PowerShell process.
  • CurrentUser: The execution policy that is set for the current user.
  • LocalMachine: The execution policy that is set for all users.
The default scope is LocalMachine and it will apply to everyone on the machine when set via PowerShell it self. To get the current execution policy we use the Get-ExecutionPolicy cmdlet running it in a session as administrator and we give it the –list parameter to list all scopes
 C:\Windows\system32> Get-ExecutionPolicy -List | ft -AutoSize 

Scope ExecutionPolicy
----- ---------------
MachinePolicy Undefined
UserPolicy Undefined
Process Undefined
CurrentUser Undefined
LocalMachine RemoteSigned

Typically for admin workstations I recommend RemoteSigned since any code downloaded from the internet I will not execute it by accident causing harm to my machine. Lets change it from RemoteSigned to Restricted, for this we use the Set-Executionpolicy and give it the policy name, we can use the –Force parameter so it will not ask for confirmation and we can conform by traying to execute a script:

C:\Windows\system32> Set-ExecutionPolicy Restricted -Force 
C:\Windows\system32> C:\Users\Carlos\Desktop\hello.ps1
C:\Users\Carlos\Desktop\hello.ps1 : File C:\Users\Carlos\Desktop\hello.ps1 cannot be loaded because running scripts is
disabled on this system. For more information, see about_Execution_Policies at
http://go.microsoft.com/fwlink/?LinkID=135170.
At line:1 char:1
+ C:\Users\Carlos\Desktop\hello.ps1
+ ~~~~~~~~~~~~~~~~~~~~~~~~~~~~~~~~~
+ CategoryInfo : SecurityError: (:) [], PSSecurityException
+ FullyQualifiedErrorId : UnauthorizedAccess

Code Signing

Code signing allows us to use cryptographic signatures to gain the following capabilities:


  • Provides an identity of the source of code.
  • Ensure detection of script modification.

To be able to add a digital signature to a script we must use a Authenticode Digital Certificate, the certificate can come from:


  • Certificate from a Certificate Authority - This type of certificate allows the signing and sharing of scripts. If a Commercial CA is used the script could be shared outside of an organization.
  • Self-Signed Certificate - This certificate is generated by a CA hosted in he computer it self where it is used.

Self-Signed Certificates

Lets look at generating a self signed certificate for use in code signing. We start by using the makecert.exe tool from the Windows SDK that can be downloaded from Microsoft for free.


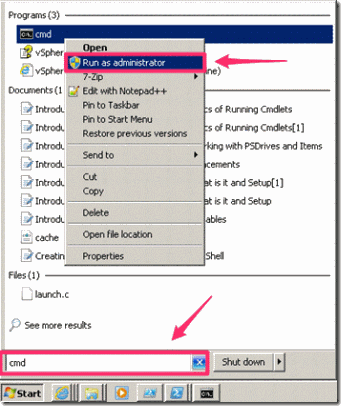
  • Run a Windows Command Prompt as Administrator
    clip_image010
  • Run the following command in the Command Prompt.  It creates a local certificate authority for your computer:


makecert -n "CN=PowerShell Local Certificate Root" -a sha1 -eku 1.3.6.1.5.5.7.3.3 -r -sv root.pvk root.cer -ss Root -sr localMachine


  • When prompted for a Private Key password provide one of your choosing that you are able to remember and confirm the password.
  • When prompted again for the password enter the password you entered in the previous step.

Next we need to use MMC for opening the local certificate store and saving the certificate:


  • Open Windows MMC on Windows

clip_image002


  • In the console window click on File and select Add/Remove Snap-in

clip_image004


  • Select “Certificates” and click on “Add”

 clip_image006


  • When prompted accept the default of “My user account” and click on “Finish”

clip_image008


  • Click on OK. This will give you a Management Console for your current user Certificate Store so we can look at the results from the commands and manage the certificates from the Windows GUI with ease.


  • Go in to the MMC Console and Select “Trusted Root Certification Authorities” -> “Certificates” and on the right pane ensure there is a Root Certificate for “PowerShell Local Certificate Root”clip_image002[5]
  • Run the following from a Command Prompt, give in the Common name filed a friendly name including your username/handle.  It generates a personal certificate from the above certificate authority:


makecert -pe -n "CN=Carlos PowerShell CSC" -ss MY -a sha1 -eku 1.3.6.1.5.5.7.3.3 -iv root.pvk -ic root.cer


  • You will be prompted for the certificate Private Key Password, enter the password that you provided when creating the CA Private Key.
  • To verify that the certificate was created and stored in the proper location go in to the console MMC Console and Select “Personal” -> “Certificates” and on the right pane ensure there is a certificate with the name that you specified in the command to create the signing certificate clip_image004[5]

You are now ready to use the self signed certificate.

Exporting Self-Signed Certificate

If you want you can export the self signed certificate for use in other systems, for that follow these steps:


  • Expand “Personal”, right click on the appropriate code signing certificate and select “All Tasks” -> “Export…”.
  • Choose the option “Yes, export the private key” when prompted.
  • Accept the default options on the “Export File Format” screen.
  • Enter a password for the private key, which will need to be entered when importing the certificate
  • Save the certificate to an appropriate location.
  • Right click “Trusted Publishers” and select “All Tasks” -> “Import…”
  • Follow the wizard to import the exported certificate, and enter in the accompanying password that was used when the certificate was exported.
  • Accept all the default values for the remaining steps in the wizard.
  • If the certificate is no longer required to be imported by other machines, it is highly recommended that the exported file is deleted.
  • Verify that the certificate was properly installed under the correct location clip_image006[6]

Signing Certificates via Active Directory Certificate Services


  • From Administration Tools select the Certificate Authority Console on your Enterprise Root Certificate Authority
  • Right click on Certificate Templates and select Manage

image


  • Double click on the Code Signing template to open it’s Properties

image


  • Add the group that you want to be able to request code signing certificates
  • Allow Read and Enroll

image


  • Right Click on Certificate Templates -> New -> Certificate Template to Issue

image


  • Click on the Code Signing template
  • Click on OK and close the Certificate Authority Console

On the developers machine:


  • Open a new MMC console 
  • From the File Menu select Add/Remove Snap-in

image


  • Select Certificates, click on Add and click on Ok
  • Make sure that My user account is selected

image


  • Click on Finish
  • Click on Ok


  • Right click on Personal Select All Tasks -> Request New Certificate

image


  • Click Next on the screen that appears
  • Select Active Directory Enrollment Policy and click on Next
  • Select the Code Signing certificate template
  • Expand Details and click on Properties

image


  • Select the Private Key
  • Select Make private key exportable
  • Click on Ok

image


  • Click on Enroll
  • Click on Finish

Using the Code Signing Certificate

Since the certificate store is mapped as a PSDrive automatically we can check if a code signing certificate is available directly from PowerShell. Having PowerShell have access to the certificate store allows to very easy manipulation and signing scripts and other files, the cmdlets for working with Authenticode are:


  • Get-AuthenticodeSignature checks the Authenticode signatures for files that support Subject Interface Package (EXE, PS1, PSXML, DLL, VBS ..etc.
  • Set-AuthenticodeSignature adds an Authenticode signature for files that support Subject Interface Package

In fact the cmdlets as we can see not only allow us to sign PowerShell Scripts and Modules but we can also sing several windows files.

To list the certificates we can just use the certificate store like any drive and ask to only show code signing certificates using the –CodeSigningCert parameter when Certificate Store PSDrive is used


image

For signin the certificate must be passed as a object to the Set-AuthenticodeSignature cmdlet so we may need to save it in to a variable. Signing of a script would be like this:

PS C:\> $acert =(dir Cert:\CurrentUser\My -CodeSigningCert)[0]

PS C:\> Set-AuthenticodeSignature .\hello.ps1 -Certificate $acert

Now when we check our script we will see it is signed:

PS C:\> Get-AuthenticodeSignature .\hello.ps1 | ft -AutoSize

Directory: C:\Users\Carlos Perez\Desktop

SignerCertificate Status Path

----------------- ------ ----

9854ABA48101875C7D9A7F79F8DD0B71C911F73C Valid hello.ps1

The script should now look like this:

image

So I hope you liked the blog post and found it informative on the second part I will cover how to bypass the execution policy and how an attacker or malware may abuse it.
PowerShell Basics–Recommendations when Importing Modules


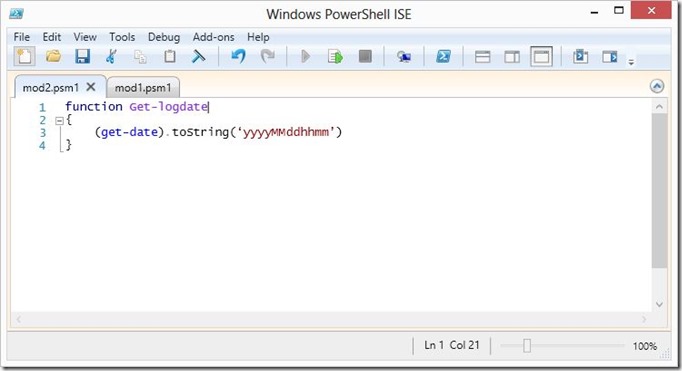
In the last blog post we covered the basics of importing Modules and PSSnapins to extend the shell, this provides us great flexibility in terms of expandability but at the same time depending on how we have configured our system this can pose functional and security risks. The main risk is a module overwriting another module function or cmdlet. Lets demonstrate why it is important to be aware of this, lets start with 2 simple modules with the same function that returns a date for us to use for naming log files:

Capture1

Lets look at what happens when we import both modules in a default configuration of PowerShell with Execution Policy not set to restricted:

Capture2

As we can see both modules loaded with no errors shown, but when we look at the function we see that by typing only the name we only have the function from the latest module that was imported available to us.

PowerShell allows us to access each element in a module be it a function, cmdlet, workflow ..etc by using the module name so we could call the functions directly from each module. But lets be honest not many people use it this way:

Capture4

If we use the –Verbose parameter when loading the modules we will see that nothing is shown to tell use that something is wrong:

Capture3

This is because for PowerShell this is normal behavior. If we do not want to replace a command with the other we use the –NoClobber parameter when we load a module, it will not show any message telling you a that a conflict was avoided unless you use the –Verbose parameter (I wish it would show a warning message):

Capture5


In PowerShell v3 this is more of a danger since Modules are loaded automatically. We can control in PowerShell v3 the behavior of the autoloading thru the variable $PSModuleAutoLoadingPreference

  • All - Modules are imported automatically on first-use.        
  • ModuleQualified - Modules are imported automatically only when a user uses the module-qualified name of a command in the module <Module Name>\<Cmdlet Name>
  • None - Automatic importing of modules is disabled in the session. To import a module, use the Import-Module cmdlet.
$PSModuleAutoLoadingPreference = "ModuleQualified"

One way to counter this would be to set default parameters to the Import-Module command, this is done by setting the values of the parameters for specific commands in $PSDefaultParameterValues the variable is a dictionary where we set up the values where the key is <Module Name>:<Parameter> =  <Default Value>:

$PSDefaultParameterValues.('Import-Module:Verbose') = $true
$PSDefaultParameterValues.('Import-Module:NoClobber') = $true

Now when we try to load a module with Import-Module it will apply this values to it:

Capture6

Now I know many of you are thinking “Why should I worry about this?” here is an evil example, lets say an attacker or malware has been able to get on your system, and you manage say Exchange, AD and/or Sharepoint server from your machine via PowerShell, many times you will use the Get-Credential cmdlet to enter alternate credentials because you are security conscious and have separation of privileges and use a separate account for administration so token abuse is minimized. What would happen if the attacker created a module in a hidden folder and hidden files in your system module path that would look like this:

Capture7

As you can see the code replaces the Get-Credential cmdlet and if verbose is given it will return the clear text credential and password entered, an attacker would just save this to file, email them or do a post request somewhere, heck he could even do a DNS query with each as the host filed to a DNS he controls and exfil the information out of your network. This would look like so when ran:

Capture8

And when we enter the credentials:

Capture9


I hope you have found the blogpost useful and informative and thank you for reading it.

PowerShell Basics - Extending the Shell with Modules and Snapins

In PowerShell there are 2 main ways to extend the shell, this are:

  • Modules - A package that contains Windows PowerShell commands int he form of functions, cmdlerts and workflows, in addition it may contain variables, aliases and providers. Modules can be written in PowerShell and/or compiled as DLLs.

  • Snap-Ins - Are compiled cmdlets in to a DLL written in a .Net language are being deprecated and no longer recommended as the way to create and package new cmdlets.

There is a big miss conception with people starting with PowerShell install server products like Exchange or SharePoint, this programs place a shortcut to what they call a "Management Shell" which is not in reality a dedicated shell for it. it is nothing more than PowerShell with a loaded Module or PSSnapin. As you will see extending the shell is quite simple and flexible.

Working with Modules

Modules have primarily 2 locations on your system:

  • %windir%\system32\WindowsPowerShell\v1.0\Modules this is the location for system wide modules available to any user in the system.
  • %USERPROFILE%\Documents\WindowsPowerShell\Modules

Each module is stored in a folder where there is a psd1 file that is known as a Module Manifest, this manifest has the settings for the module and sets the restrictions for it in terms of .Net Framework version, version of PowerShell, files to load, version, copyright, author and many other settings. This file can load what is called a main module and sub-modules each can either be a psm1 or dll file, in addition they can also be scripts that gets processes. As it can be seen using modules provide great flexibility in terms of formats and structure.

We can also have modules in other locations that can be accessed by the PowerShell session we run in, the locations are defined in the environment variable $env:PSModulePath

C:\> $env:PSModulePath
C:\Users\Carlos\Documents\WindowsPowerShell\Modules;C:\Windows\system32\WindowsPowerShell\v1.0\Modules\

If we want to add another path for PowerShell to look at we just add that path to the current environment variable:

$env:psmodulepath = $env:psmodulepath + ";"

To list the modules that are available we use the Get-Module cmdlet withe the -listavailable parameter:

Get-Module -ListAvailable

This will list all modules that the session can see in the paths that are specified in the environment variable. On PowerShell v2 we would have to load each module we wanted by hand and only then would be be able to use the commands available, in the case of PowerShell v3 Microsoft now allows us access to the modules in those paths and the modules are loaded dynamically when a cmdlet, workflow, alias or function that form part of the module is invoked.

If you only want to see the modules that are currently loaded in to the session the -All parameter is used with Get-Module:

C:\> Get-Module -All

ModuleType NameExportedCommands
---------- --------------------
Script Discovery {Invoke-ARPScan, Invoke-PingScan, Invoke-PortScan, Invoke-ReverseDNSLookup...
Binary Microsoft.PowerShell.Activities
Binary Microsoft.PowerShell.Commands.Ma... {Add-Content, Clear-Content, Clear-ItemProperty, Join-Path...}
Binary Microsoft.PowerShell.Commands.Ut... {Get-FormatData, Export-FormatData, Format-List, Format-Custom...}
Manifest Microsoft.PowerShell.Management {Add-Computer, Add-Content, Checkpoint-Computer, Clear-Content...}
Manifest Microsoft.PowerShell.Utility{Add-Member, Add-Type, Clear-Variable, Compare-Object...}
Binary Microsoft.Powershell.Workflow.Se... {Import-PSWorkflow, New-PSWorkflowExecutionOption}
Script Parse {Import-DNSReconXML, Import-NessusReport}
Script posh-git{Add-SshKey, Enable-GitColors, Get-AliasPattern, Get-GitDirectory...}
Script posh-nessus {Copy-NessusPolicy, Get-NessusPolicyXML, Get-NessusReportHostsDetailed, Ge...
Script Posh-SecMod {Add-Zip, Compress-PostScript, Confirm-IsAdmin, Connect-SQLite3...}
Binary PoshSSH {New-SSHSession, New-SFTPSession}
Script Posh-SSH{New-SFTPSession, New-SSHSession, Get-SFTPCurrentDirectory, Get-SFTPDirect...
Script PostExploitation{Compress-PostScript, ConvertTo-PostBase64Command, New-PostDownloadExecute...
Script PSWorkflow{New-PSWorkflowSession, nwsn}
Manifest PSWorkflow{New-PSWorkflowExecutionOption, New-PSWorkflowSession, nwsn}
Script Registry{Get-RegKeys, Get-RegKeySecurityDescriptor, Get-RegValue, Get-RegValues...}

To import a module in to our session we just use the Import-Module cmdlet and give it the name of the module. I tend to recommend to people starting with PowerShell that when working on a shell session interactively to always add the -Verbose parameter,, this will list the cmdlets, functions and aliases that are being made available to you when you import the module. Lets take for example a module that I have been developing for automating tasks via SSH:

C:\> Import-Module -Name Posh-SSH -Verbose
VERBOSE: Loading module from path 'C:\Users\Carlos\Documents\WindowsPowerShell\Modules\Posh-SSH\Posh-SSH.psd1'.
VERBOSE: Importing cmdlet 'New-SFTPSession'.
VERBOSE: Importing cmdlet 'New-SSHSession'.
VERBOSE: Importing function 'Get-SFTPCurrentDirectory'.
VERBOSE: Importing function 'Get-SFTPDirectoryList'.
VERBOSE: Importing function 'Get-SFTPFile'.
VERBOSE: Importing function 'Get-SFTPSession'.
VERBOSE: Importing function 'Get-SSHPortForward'.
VERBOSE: Importing function 'Get-SSHSession'.
VERBOSE: Importing function 'Invoke-SSHCommand'.
VERBOSE: Importing function 'Move-SFTPFile'.
VERBOSE: Importing function 'New-SFTPDirectory'.
VERBOSE: Importing function 'New-SSHDynamicPortForward'.
VERBOSE: Importing function 'New-SSHPortForward'.
VERBOSE: Importing function 'Remove-SFTPDirectory'.
VERBOSE: Importing function 'Remove-SFTPFile'.
VERBOSE: Importing function 'Remove-SFTPSession'.
VERBOSE: Importing function 'Remove-SSHSession'.
VERBOSE: Importing function 'Set-SFTPDirectoryPath'.
VERBOSE: Importing function 'Set-SFTPFile'.
VERBOSE: Importing function 'Start-SSHPortForward'.
VERBOSE: Importing function 'Stop-SSHPortForward'.

As you can see it tells me the cmdlets and script functions it loaded in to the session. If you are in a session and want to know if a module is loaded the Get-Module cmndlet with the -Name option is use and we give it the module name we want to know about, if it returns the information about the module the module is loaded, if nothing is returned the module is not:

C:\> Get-Module -Name posh-ssh

ModuleType NameExportedCommands
---------- --------------------
Script Posh-SSH{New-SFTPSession, New-SSHSession, Get-SFTPCurrentDirectory, Get-SFTPDirect...

To remove the module from our session we use the Remove-Module cmdlet and give it the name of the module we want to remove:

C:\> Remove-Module -Name posh-ssh -Verbose
VERBOSE: Performing operation "Remove-Module" on Target "PoshSSH (Path:
'C:\Users\Carlos\Documents\WindowsPowerShell\Modules\Posh-SSH\PoshSSH.dll')".
VERBOSE: Performing operation "Remove-Module" on Target "Posh-SSH (Path:
'C:\Users\Carlos\Documents\WindowsPowerShell\Modules\Posh-SSH\Posh-SSH.psm1')".
VERBOSE: Removing the imported "Get-SFTPCurrentDirectory" function.
VERBOSE: Removing the imported "Get-SFTPDirectoryList" function.
VERBOSE: Removing the imported "Get-SFTPFile" function.
VERBOSE: Removing the imported "Get-SFTPSession" function.
VERBOSE: Removing the imported "Get-SSHPortForward" function.
VERBOSE: Removing the imported "Get-SSHSession" function.
VERBOSE: Removing the imported "Invoke-SSHCommand" function.
VERBOSE: Removing the imported "Move-SFTPFile" function.
VERBOSE: Removing the imported "New-SFTPDirectory" function.
VERBOSE: Removing the imported "New-SSHDynamicPortForward" function.
VERBOSE: Removing the imported "New-SSHPortForward" function.
VERBOSE: Removing the imported "Remove-SFTPDirectory" function.
VERBOSE: Removing the imported "Remove-SFTPFile" function.
VERBOSE: Removing the imported "Remove-SFTPSession" function.
VERBOSE: Removing the imported "Remove-SSHSession" function.
VERBOSE: Removing the imported "Set-SFTPDirectoryPath" function.
VERBOSE: Removing the imported "Set-SFTPFile" function.
VERBOSE: Removing the imported "Start-SSHPortForward" function.
VERBOSE: Removing the imported "Stop-SSHPortForward" function.
C:\> Get-Module -Name posh-ssh
C:\>

You can see in the example I used the Get-Module cmdlet to confirm the module is not present. We can also load modules by calling directly the DLL or the PSM1 file, lets call another module I'm still developing for controlling Metasploit:

C:\> Import-Module C:\Users\Carlos\Desktop\Posh-Metasploit.psm1 -Verbose
VERBOSE: Loading module from path 'C:\Users\Carlos\Desktop\Posh-Metasploit.psm1'.
VERBOSE: Exporting function 'New-MSFSession'.
VERBOSE: Exporting function 'Get-MSFSession'.
VERBOSE: Exporting function 'Invoke-MSFExploit'.
VERBOSE: Exporting function 'Invoke-MSFAuxiliary'.
VERBOSE: Exporting function 'Get-MSFModuleInfo'.
VERBOSE: Exporting function 'Get-MSFJobs'.
VERBOSE: Exporting function 'Get-MSFSessions'.
VERBOSE: Exporting function 'Get-MSFNotes'.
VERBOSE: Exporting function 'Get-MSFServices'.
VERBOSE: Exporting function 'Get-MSFHosts'.
VERBOSE: Exporting function 'Get-MSFLoot'.
VERBOSE: Exporting function 'Get-MSFCredentials'.
VERBOSE: Importing function 'Get-MSFCredentials'.
VERBOSE: Importing function 'Get-MSFHosts'.
VERBOSE: Importing function 'Get-MSFJobs'.
VERBOSE: Importing function 'Get-MSFLoot'.
VERBOSE: Importing function 'Get-MSFModuleInfo'.
VERBOSE: Importing function 'Get-MSFNotes'.
VERBOSE: Importing function 'Get-MSFServices'.
VERBOSE: Importing function 'Get-MSFSession'.
VERBOSE: Importing function 'Get-MSFSessions'.
VERBOSE: Importing function 'Invoke-MSFAuxiliary'.
VERBOSE: Importing function 'Invoke-MSFExploit'.
VERBOSE: Importing function 'New-MSFSession'.

If you are developing a module and whant to reload the module with the changes you just made I recommend just using the Import-Module cmdlet with the -Force parameter instead of removing and importing the module again. If we want tot see the command for a specific module we can use the Get-Command cmdlet:

C:\> Get-Command -Module Bitlocker

CommandType Name ModuleName
----------- ---- ----------
FunctionAdd-BitLockerKeyProtectorBitlocker
FunctionBackup-BitLockerKeyProtector Bitlocker
FunctionClear-BitLockerAutoUnlockBitlocker
FunctionDisable-BitLockerBitlocker
FunctionDisable-BitLockerAutoUnlockBitlocker
FunctionEnable-BitLocker Bitlocker
FunctionEnable-BitLockerAutoUnlock Bitlocker
FunctionGet-BitLockerVolumeBitlocker
FunctionLock-BitLocker Bitlocker
FunctionRemove-BitLockerKeyProtector Bitlocker
FunctionResume-BitLocker Bitlocker
FunctionSuspend-BitLockerBitlocker
FunctionUnlock-BitLocker Bitlocker

Working with PSSnapins

PSSnapings is the old method from PowerShell v1 that is used to extend the shell, in PowerShell v2 and PowerShell v3 it can still be used but Microsoft has started to tell developers to move away from the sanpin model and move to the module model of extending the shell. Still many 3rd Party extension, the most popular being VMware PowerCLI, in fact Microsoft PowerShell core cmdlets are still in snapin format so we will still see support for snapins for a while.

We can list the cmdlets available for managing PSSnapin usin the Get-Command cmdlet and giving it PSSnapin as the verb to look for:

C:\> Get-Command -Noun PSSnapin

CommandType Name ModuleName
----------- ---- ----------
CmdletAdd-PSSnapin Microsoft.PowerShell.Core
CmdletGet-PSSnapin Microsoft.PowerShell.Core
CmdletRemove-PSSnapinMicrosoft.PowerShell.Core

Since snapins are DLLs that get registered on the system unlike modules that do not need any registration we use the -Registered paramter with the Get-PSSnapin cmdlet to list the snapins available:

C:\> Get-PSSnapin -Registered


Name: VMware.DeployAutomation
PSVersion : 2.0
Description : Cmdlets for Rule-Based-Deployment

Name: VMware.ImageBuilder
PSVersion : 2.0
Description : This Windows PowerShell snap-in contains VMware ESXi Image Builder cmdlets used to generate custom images.

Name: VMware.VimAutomation.Core
PSVersion : 2.0
Description : This Windows PowerShell snap-in contains Windows PowerShell cmdlets for managing vSphere.

Name: VMware.VimAutomation.License
PSVersion : 2.0
Description : This Windows Powershell snap-in contains cmdlets for managing License components.

To load a snapin we use the Add-PSSnapin cmdlet and give it the name of the PSSnapin we want to load:

C:\> Add-PSSnapin -Name VMware.VimAutomation.Core
C:\> Remove-PSSnapin -Name VMware.VimAutomation.Core
C:\> Add-PSSnapin -Name VMware.VimAutomation.Core -Verbose
C:\>

The cmndlet does not produce any output, even when -Verbose is used as it can be see in the example. To see what snapins are loaded we use the Get-PSSnapin with no parameters:

C:\> Get-PSSnapin


Name: Microsoft.PowerShell.Core
PSVersion : 3.0
Description : This Windows PowerShell snap-in contains cmdlets used to manage components of Windows PowerShell.

Name: VMware.VimAutomation.Core
PSVersion : 2.0
Description : This Windows PowerShell snap-in contains Windows PowerShell cmdlets for managing vSphere.

To get a list of the cmdlets and Functions it importer we use the Get-Command cmdlet wit the -Module parameter and give it the PSSnapin name:

C:\> Get-Command -Module VMware.VimAutomation.Core

CommandType Name ModuleName
----------- ---- ----------
CmdletAdd-PassthroughDeviceVMware.VimAutomation.Core
CmdletAdd-VMHost VMware.VimAutomation.Core
CmdletAdd-VmHostNtpServerVMware.VimAutomation.Core
CmdletApply-DrsRecommendationVMware.VimAutomation.Core
CmdletApply-VMHostProfileVMware.VimAutomation.Core
CmdletConnect-VIServer VMware.VimAutomation.Core
CmdletCopy-DatastoreItem VMware.VimAutomation.Core
CmdletCopy-HardDiskVMware.VimAutomation.Core
CmdletCopy-VMGuestFile VMware.VimAutomation.Core
CmdletDisconnect-VIServerVMware.VimAutomation.Core
CmdletDismount-Tools VMware.VimAutomation.Core
CmdletExport-VAppVMware.VimAutomation.Core
.......

As it can be seen PSSnapins are limited, thus making their management simpler.

As always I hope you found the blogpost useful and informative, as a side note many of the Modules you see in my machine are projects I have started and not finished so do ask for when I will release those because many I just do not know other than the SSH module that is in my GitHub.

Introduction to WMI Basics with PowerShell Part 2 (Exploring WMI using WMI and CIM Cmdlets)

In the previous blog post I covered how to explorer WMI using a GUI tool, now lets look at how to explorer WMI first using the WMI Cmdlets that are found in PowerShell v2 and PowerShell v3, then we will look at how to use CIM Cmdlets that where introduced in PowerShell v3 and the improvements Microsoft did to make using WMI even better in PowerShell v3.

Exploring WMI with WMI Cmdlets

Lets first lets look at the WMI Cmdlets that are available to us using the Get-Command cmdlet:
Get-Command -noun wmi* 

PS C:\> Get-Command -Noun wmi*

CommandType Name ModuleName
----------- ---- ----------
Cmdlet Get-WmiObject Microsoft.PowerShell.Management
Cmdlet Invoke-WmiMethod Microsoft.PowerShell.Management
Cmdlet Register-WmiEvent Microsoft.PowerShell.Management
Cmdlet Remove-WmiObject Microsoft.PowerShell.Management
Cmdlet Set-WmiInstance Microsoft.PowerShell.Management

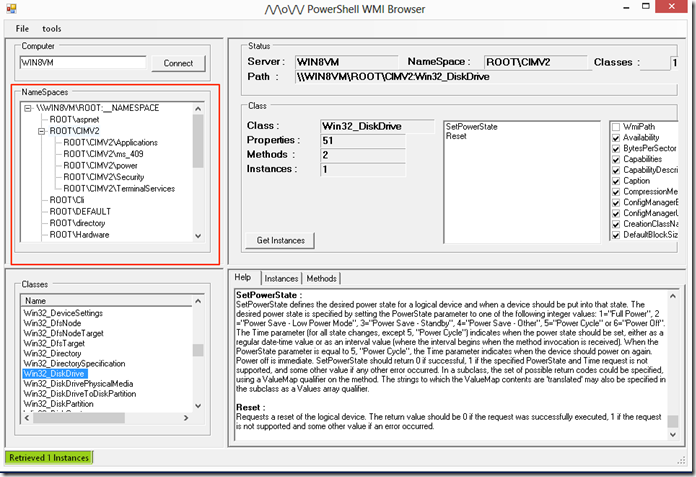
When working with WMI Cmdlets the most used one is the Get-WmiObject. Lets start by exploring and enumerating the different Namespaces. On the GUI this are the ones shown in a folder structure:

image

Lets look at all the Namespaces under Root by looking at the __namespace class:

Get-WmiObject -Class __Namespace -Namespace root | select name 

PS C:\> Get-WmiObject -Class __Namespace -Namespace root | select name

name
----
subscription
DEFAULT
CIMV2
msdtc
Cli
nap
SECURITY
SecurityCenter2
RSOP
StandardCimv2
WMI
directory
Policy
Interop
Hardware
ServiceModel
SecurityCenter
ThinPrint
Microsoft
aspnet

Now that we enumerated the namespaces under root we can look at the other namespaces by just appending them to the original namespace we queried allowing us to navigate the namespaces:

Get-WmiObject -Class __Namespace -Namespace root\CIMV2 | select name 

PS C:\> Get-WmiObject -Class __Namespace -Namespace root\CIMV2 | select name

name
----
Security
power
ms_409
TerminalServices
Applications

Now lets look at enumerating the Classes under the namespace, this is done by using the –list parameter. The list parameter does provide one flexibility most free GUI do not provide and this is filtering the class names using wildcards:

 Get-WmiObject -list *account* 

PS C:\> Get-WmiObject -list *account*


NameSpace: ROOT\cimv2

Name Methods Properties
---- ------- ----------
MSFT_NetBadAccount {} {SECURITY_DESCRIPTOR, TIME_CREATED}
Win32_Account {} {Caption, Description, Domain, InstallDate...
Win32_UserAccount {Rename} {AccountType, Caption, Description, Disabled.
Win32_SystemAccount {} {Caption, Description, Domain, InstallDate...
Win32_AccountSID {} {Element, Setting}

To list all the classes we just use * as the wildcard to have it list all classes, we can choose what name space to enumerate using the –namespace parameter.

Get-WmiObject -list *sensor* -Namespace root\cimv2\power 

PS C:\> Get-WmiObject -list *sensor* -Namespace root\cimv2\power


NameSpace: ROOT\cimv2\power

Name Methods Properties
---- ------- ----------
CIM_Sensor {RequestStateChan... {AdditionalAvailability, Availability, AvailableRequestedStates,...
CIM_NumericSensor {RequestStateChan... {Accuracy, AdditionalAvailability, Availability, AvailableReques...

To get details on a class it is not as simple as a single command:

(gwmi -list win32_service -Amended).qualifiers | Select name, value | ft -AutoSize -Wrap

PS C:\> (gwmi -list win32_service -Amended).qualifiers | Select name, value | ft -AutoSize -Wrap

Name Value
---- -----
Description The Win32_Service class represents a service on a Win32 computer system. A service application conforms to
the interface rules of the Service Control Manager (SCM) and can be started by a user automatically at
system boot through the Services control panel utility, or by an application that uses the service functions
included in the Win32 API. Services can execute even when no user is logged on to the system.
DisplayName Services
dynamic True
Locale 1033
provider CIMWin32
SupportsUpdate True
UUID {8502C4D9-5FBB-11D2-AAC1-006008C78BC7}

To simplify the process of getting information on a class I recommend that you create a function like the following and place it in your user PowerShell profile in %UserProfile%\My Documents\WindowsPowerShell\profile.ps1 :

function Get-WMIClassInfo

{

param(

[string]$className

)

(Get-WmiObject -list $className -Amended).qualifiers | Select-Object name, value

}

This will make the function available to aid in getting information about classes:

 Get-WMIClassInfo win32_process | ft -AutoSize -Wrap 

PS C:\> Get-WMIClassInfo win32_process | ft -AutoSize -Wrap

Name Value
---- -----
CreateBy Create
DeleteBy DeleteInstance
Description The Win32_Process class represents a sequence of events on a Win32 system. Any sequence consisting of the
interaction of one or more processors or interpreters, some executable code, and a set of inputs, is a
descendent (or member) of this class.
Example: A client application running on a Win32 system.
DisplayName Processes
dynamic True
Locale 1033
provider CIMWin32
SupportsCreate True
SupportsDelete True
UUID {8502C4DC-5FBB-11D2-AAC1-006008C78BC7}

In WMI a class can have 2 types of states:


  • Class it self with its own list of Static Methods and Properties.
  • Class Instances  these are the representation of state of several components of the OS or Hardware that are reference under the class.

One good way to illustrate this would be to look at the Win32_Process class, lets look at the class it self for thise we use with the Get-WmiObject cmdlet the –list paramter and the name of the class to get only the class itself and look at the methods we have available:

 Get-WmiObject -list win32_process | Get-Member -MemberType Method 

PS C:\> Get-WmiObject -list win32_process  | Get-Member -MemberType Method


TypeName: System.Management.ManagementClass#ROOT\cimv2\Win32_Process

Name MemberType Definition
---- ---------- ----------
Create Method System.Management.ManagementBaseObject Create(System.String Commandline ...

As we can see we only have one and it is to create a process. We can even use it to create say a notepad.exe process:

$win32proc = Get-WmiObject -list win32_process

$win32proc.Create("notepad.exe")

PS C:\> $win32proc = Get-WmiObject -list win32_process
PS C:\> $win32proc.Create("notepad.exe")


__GENUS : 2
__CLASS : __PARAMETERS
__SUPERCLASS :
__DYNASTY : __PARAMETERS
__RELPATH :
__PROPERTY_COUNT : 2
__DERIVATION : {}
__SERVER :
__NAMESPACE :
__PATH :
ProcessId : 3332
ReturnValue : 0
PSComputerName :

A return value of 0 means that it ran successfully and notepad should pop in you taskbar on Windows. When we look at instances we just use the –Class parameter with the Get-WmiObject cmdlet and give it the class we want to get the instances off, when we look at the methods we see we get a different set of methods since we are now working with an instance of each of the running processes on the system:

 Get-WmiObject -Class win32_process | Get-Member -MemberType method 

PS C:\> Get-WmiObject -Class win32_process | Get-Member -MemberType method


TypeName: System.Management.ManagementObject#root\cimv2\Win32_Process

Name MemberType Definition
---- ---------- ----------
AttachDebugger Method System.Management.ManagementBaseObject AttachDebugger()
GetOwner Method System.Management.ManagementBaseObject GetOwner()
GetOwnerSid Method System.Management.ManagementBaseObject GetOwnerSid()
SetPriority Method System.Management.ManagementBaseObject SetPriority(System.Int32 Priority)
Terminate Method System.Management.ManagementBaseObject Terminate(System.UInt32 Reason)


Exploring WMI with CIM cmdlets

We can see on the latest versions of Windows (Windows 8 and Windows 2012) that Microsoft is advancing its implementation of an open standard for management with Common Information Model (CIM) by integrating it with Windows Remote Management v3 that are part of the Windows Management Framework 3. We can see this in the new Server Manager tool where it uses WinRM for management on Windows 2012. WinRM being based on Microsoft implementation of WS-Management Protocol, a standard Simple Object Access Protocol (SOAP)-based, firewall-friendly protocol that allows hardware and operating systems, from different vendors, to interoperate. This is a shift to provide more interoperability with other platforms and products and Microsoft provides a new set of cmdlets for this.

We can use the Get-Command cmdlet to list the CIM cmdlets that are available in PowerShell v3:

 Get-Command -module CimCmdlets 

PS C:\> Get-Command -module CimCmdlets

CommandType Name ModuleName
----------- ---- ----------
Cmdlet Get-CimAssociatedInstance CimCmdlets
Cmdlet Get-CimClass CimCmdlets
Cmdlet Get-CimInstance CimCmdlets
Cmdlet Get-CimSession CimCmdlets
Cmdlet Invoke-CimMethod CimCmdlets
Cmdlet New-CimInstance CimCmdlets
Cmdlet New-CimSession CimCmdlets
Cmdlet New-CimSessionOption CimCmdlets
Cmdlet Register-CimIndicationEvent CimCmdlets
Cmdlet Remove-CimInstance CimCmdlets
Cmdlet Remove-CimSession CimCmdlets
Cmdlet Set-CimInstance CimCmdlets

Another advantage in addition to using WinRM and also being able to connect to other platforms like Linux or Network equipment that conforms to the CIM standard Microsoft added tab completion for class names and properties in the CIM cmdlets allowing for simpler discovery of classes.  To list namespaces we would use the Get-CimInstance cmdlet, we can use the tab completion by doing Get-CimInstance __name<tab> and have it auto complete it:

Get-CimInstance __namespace 

PS C:\> Get-CimInstance __namespace

Name PSComputerName
---- --------------
Security
power
ms_409
TerminalServices
Applications

If we do not specify a namespace with the –namespace parameter it will enumerate the default one of Root\CIMv2.

For enumerating classes we use the Get-CimClass cmdlet:

 Get-CimClass -ClassName *account* 

PS C:\> Get-CimClass -ClassName *account*


NameSpace: ROOT/CIMV2

CimClassName CimClassMethods CimClassProperties
------------ --------------- ------------------
MSFT_NetBadAccount {} {SECURITY_DESCRIPTOR, TIME_CREATED}
Win32_Account {} {Caption, Description, InstallDate, Name...}
Win32_UserAccount {Rename} {Caption, Description, InstallDate, Name...}
Win32_SystemAccount {} {Caption, Description, InstallDate, Name...}
Win32_AccountSID {} {Element, Setting}

As we can see Microsoft even made it simpler for us by showing the Class Methods and Class properties. But in addition to allowing us to search by class name we can also search by property name and method name giving us more flexibility because there is so much less to type:

 Get-CimClass -MethodName create 

PS C:\> Get-CimClass -MethodName create


NameSpace: ROOT/cimv2

CimClassName CimClassMethods CimClassProperties
------------ --------------- ------------------
Win32_Process {Create, Terminat... {Caption, Description, InstallDate, Name...}
Win32_ScheduledJob {Create, Delete} {Caption, Description, InstallDate, Name...}
Win32_DfsNode {Create} {Caption, Description, InstallDate, Name...}
Win32_BaseService {StartService, St... {Caption, Description, InstallDate, Name...}
Win32_SystemDriver {StartService, St... {Caption, Description, InstallDate, Name...}
Win32_Service {StartService, St... {Caption, Description, InstallDate, Name...}
Win32_TerminalService {StartService, St... {Caption, Description, InstallDate, Name...}
Win32_Share {Create, SetShare... {Caption, Description, InstallDate, Name...}
Win32_ClusterShare {Create, SetShare... {Caption, Description, InstallDate, Name...}
Win32_ShadowCopy {Create, Revert} {Caption, Description, InstallDate, Name...}
Win32_ShadowStorage {Create} {AllocatedSpace, DiffVolume, MaxSpace, UsedSpace...}

For getting the instances of a class we use the Get-CimInstance, as you can see in the WMI cmdlets the Get-WmiObject is the Swiss Army knife that allows you to do most of the  tasks related to WMI while on CIM the tasks have been split in to cmdlets. Lets use the cmdlet to get all the instances for Win32_DiskDrive that represent each of the disk on the system:

PS C:\> Get-CimInstance -ClassName Win32_DiskDrive | fl


Partitions : 2
DeviceID : \\.\PHYSICALDRIVE0
Model : VMware, VMware Virtual S SCSI Disk Device
Size : 64420392960
Caption : VMware, VMware Virtual S SCSI Disk Device

Now when it comes to the use of methods with CIM cmdlets the flexibility we had with WMI cmdlets is sadly missing, with WMI cmdlets when we got the class or the instances of the class as part of the object that was returned we also had methods to each that allowed us to invoke the method and have actions taken against what the class instace represented, with CIM objects we need to use the Invoke-CimMethod cmdlet. Lets look at the same example we used above where we created a notepad.exe process:

Invoke-CimMethod Win32_Process -MethodName create -Arguments @{CommandLine='notepad.exe'} 
x

PS C:\> Invoke-CimMethod Win32_Process -MethodName create -Arguments @{CommandLine='notepad.exe'}

ProcessId ReturnValue PSComputerName
--------- ----------- --------------
2684 0

As it can be seen when a method is invoked with the CIM cmdlet we must provide it the name of the method and if this method takes a parameter we must specify the parameter in a Hash where the key is the parameter name. In WMI cmdlets we would use the invoke-wmimethod, they are similar in operation and getting used to CIM cmdlets just takes a little practice if you have been using WMI cmdlets on PowerShell v2 for a while. Lets look terminating all notepad.exe processes with WMI cmdlet and then with CIM cmdlets so you can see the similarities:

# WMI Cmdlet example

Invoke-WmiMethod -Class win32_Process -Name create -ArgumentList notepad.exe

Get-WmiObject win32_process -Filter "name='notepad.exe'" | foreach {$_.terminate()}


# CIM Cmdlet example

Invoke-CimMethod Win32_Process -MethodName create -Arguments @{CommandLine='notepad.exe'}

Get-CimInstance Win32_Process -Filter "name='notepad.exe'" | Invoke-CimMethod -MethodName terminate

PS C:\> Invoke-WmiMethod -Class win32_Process -Name create -ArgumentList notepad.exe


__GENUS : 2
__CLASS : __PARAMETERS
__SUPERCLASS :
__DYNASTY : __PARAMETERS
__RELPATH :
__PROPERTY_COUNT : 2
__DERIVATION : {}
__SERVER :
__NAMESPACE :
__PATH :
ProcessId : 2668
ReturnValue : 0
PSComputerName :

PS C:\> Get-WmiObject win32_process -Filter "name='notepad.exe'" | foreach {$_.terminate()}


__GENUS : 2
__CLASS : __PARAMETERS
__SUPERCLASS :
__DYNASTY : __PARAMETERS
__RELPATH :
__PROPERTY_COUNT : 1
__DERIVATION : {}
__SERVER :
__NAMESPACE :
__PATH :
ReturnValue : 0
PSComputerName :

PS C:\> Invoke-CimMethod Win32_Process -MethodName create -Arguments @{CommandLine='notepad.exe'}

ProcessId ReturnValue PSComputerName
--------- ----------- --------------
3316 0


PS C:\> Get-CimInstance Win32_Process -Filter "name='notepad.exe'" | Invoke-CimMethod -MethodName terminate

ReturnValue PSComputerName
----------- --------------
0

As you can see the cmdlets operate very similarly.

I invite you to use the Get-Help cmdlet against each of the cmdlets mentioned here to learn more about them. As always I hope you found the blogpost useful.

PowerShell Basics–Filtering and Iterating over Objects

Now that we know that commands in PowerShell produce objects and that they have properties we can now start comparing, filtering and manipulating the objects.

Operators

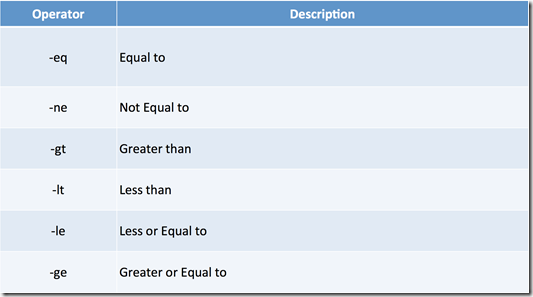
For the manipulation of objects we will cover first the Operators in PowerShell since they are used against Objects and the Properties of objects. You will notice that the operators for comparison operators in PowerShell will differ from those in Ruby, Python, Perl and other scripting languages and mimic more those found in Unix type shells so a Bash programmer will feel at ease with the operators in PowerShell. When comparisons are done PowerShell has the special variables $True and $False to represent Boolean values.

image

One thing to keep in mind when working with PowerShell is that it is case insensitive so when we are doing comparisons and we want them to be case sensitive we have to explicitly specify to be case sensitive.

PS > "hello" -eq "HELLO" 
True
To make a comparison be case sensitive one only need to add a c to the comparison.
PS > "hello" -ceq "HELLO" 
False
PowerShell will try to convert the types of the element for evaluation by analyzing them. It ill use the value on the left as the type to convert the type on the right.
PS > 1 -eq "1" 
True

There are also operators for comparing collections and type:

image

One common mistake by many starting with PowerShell is that many times -contains and -in operators are used by mistake to search in strings. Their use is for Arrays or Hash lists.

PS > "a","b","c" -contains "b" 
True 

PS > "b" -in "a","b","c" 
True
PowerShell also allow also to compare by type. The operators are: Type operators are mostly used to make sure the proper type is used in scripts
C:\PS> (get-date) -is [datetime] 
True 

C:\PS> (get-date) -isnot [datetime] 
False 

C:\PS> "9/28/12" -as [datetime] 
Friday, September 28, 2012 12:00:00 AM 

We can join several comparisons using Boolean Operators and each comparison operator is considered a subexpression.

image

Subexpressions can be parenthetical or cmdlets that return a Boolean. An example would be :

PS C:\> ((1 -eq 1) -or (15 -gt 20)) -and ("running" -like "*run*") 
True

Selecting Objects

The Select-Object cmdlet allows for:

  • Selecting specific objects or a Range of objects from an ordered collection of objects that contains specific properties.
  • Selecting a given number from the beginning or end of a ordered list of objects.
  • Select specific properties from objects.
  • Creation of new object with properties Renaming object properties .

The Select-Object cmdlets allows us to select from a collection of objects the ones we want when we specify the index position of the item. Just like all programing languages we start our count with 0.

PS > Get-Process | Sort-Object name -Descending | Select-Object -Index 0,1,2,3,4 

We can also use the range notation, this will return an array of number for the range and we can pass those to the index parameter.

PS > Get-Process | Sort-Object name -Descending | Select-Object -Index (0..4)

Select the first number of objects, the last number of objects or even skip a certain number.

PS > Get-Process | Sort-Object name -Descending | Select-Object -first 5 

The select-object cmdlets also allows us to create and rename an objects property, this is very useful when the property name is not to descriptive and when we are passing from one comdlet to another where the next cmdlet accepts and processes objects by Property Name. The way it works is that we create a hash with 2 values in it, one is Name which is the name we ant for the property and the other is expressions which is a script block whose returning value will be set as the value of the property we named.

PS > Get-Process | Select-Object -Property name,@{name = 'PID'; expression = {$_.id}} 

One thing that we have to be very careful with when using Select-Object is that when we select property names using it actually generates a new object of the same type with only those properties that we selected and strips out the rest. Depending on the chaining of cmdlets using the pipeline this could cause us to loose a property we may need further along the pipeline chain so do keep it in mind and be careful.

Iterating over Objects

Iteration is the method by which several objects in a collection are processed one by one and actions are taken against them. In PowerShell, there are 2 methods for iterating thru objects and are often confused:

  • ForEach-Object cmdlet and its aliases foreach and %.
  • foreach( in ){} statement.

As you can see the main reason for the confusion is that Foreach-Object has an alias of foreach which can be confused with the statement. Each method will take a collection and process the objects in a Scriptblock but each behaves differently, however and its use will vary case by case.

Lets start with Foreach-Object. The ForEach-Object cmdlet takes a stream of objects from the pipeline and processes each and it uses less memory do to garbage control, as objects gets processed and they are passed thru the pipeline they get removed from memory. The cmdlet takes 4 main parameters:

  • Begin <Script block> executed before processing all objects
  • Process <Script block> executed per each object being processed
  • End <Script block > to be executed after all objects have been processing all objects.
  • InputObject <PSObject> to take actions against. Typically this is taken thru the pipeline.

The ScriptBlocks parameters are also positional

PS C:\> 1..5 | ForEach-Object { $Sum = 0 } { $Sum += $_ } { $Sum } 
15 
To skip to the next object to be process in ForEach-Object the keyword Continue is used. For exiting the loop inside of a ForEach-Object the break keyword is used.
C:\PS> $Numbers = 4..7 
C:\PS> 1..10 | foreach-object { if ($Numbers -contains $_) { continue }; $_ } 
1 
2 
3 

Now lets take a look at the at the Foreach statement. The foreach( in ){} statement places on each iteration an element of a collection in to memory first and then processes each. (Not good for extremely large collections on memory constrained systems). Since the collection being worked on is loaded in to memory it tends to be faster than the ForEach-Object cmdlet.

To skip to the next object to be process in foreach statement the keyword continue is used. For exiting the loop inside of a foreach statement the break keyword is used.

  • The foreach statement has a special variable called $foreach with 2 special methods that can be used: $foreach.MoveNext() to skip to the next element in the collection and continue to process the next element in the collection. Returns a Boolean true value that should be handled.
  • $foreach.Current to represent the current element being processed

The foreach statement can even be used in a interactive shell session:

PS >foreach ($i in (1..10)){ 
>>    if ($i -gt 5){ 
>>        continue 
>>    } 
>>    $i 
>> } 
>>
1 
2 
3 
4 
5 
As always I hope you have found this blogpost informative and useful. Thanks.