PowerShell Basics–Using the Help Subsystem

Before we start running commands one of the fist things we have to do is to understand the rich help subsystem in PowerShell or as we say to many users in our IT life, RTFM. One of the first things to cover is that Help Subsystem in PowerShell v3 was improved so as to be able to update its contents.

Updating PowerShell v3 Help

We can update the help system from Microsoft it self or from a share or drive in the case the machine does not have access to the internet. Windows 8 and Windows 2012 come with no PowerShell help files as does a install of PowerShell v3 on a Windows 7, 2008 or 2008 R2 system so the first step we have to take is to run the Get-Help cmdlet to update our help files if our system has internet connection. Things to consider when running the Get-Help cmdlet for updating the help files from the internet:

  • To update the help files the account you run the command from must be part of the Local Administrators group and it must be ran from a PowerShell console running as elevated privileges.
  • It will use the Proxy settings configured on Internet Explorer.
  • If the proxy requires NTLM, negotiate, or Kerberos-based authentication the –UseDefaultCredentials parameter must be used so ad to use the current user credentials to authenticate with the proxy.
  • We can only update the help files once every 24 hours  if we want to update inside the 24 hours we would have to use the –Force parameter.

    When it executes it will perform the following actions:

  • Determines which modules support Updatable Help.
  • Finds the Internet location where each module stores its Updatable Help files.
  • Compares the help files for each module on your computer to the newest help files that are available for each module.
  • Downloads the new files from the Internet.
  • Unwraps the help file package.
  • Verifies that the files are valid help files.
  • Installs the help files in the language-specific subdirectory of the module directory.

    We can also update from a share in the network or from a location on the computer (USB Stick, External Hard Drive..) for those hosts that we decided to limit the risk of data exfiltration by not permitting them access to the internet or the machines are isolated for other reasons. So lets cover how this would be done:

  • We start by downloading from a machines that has internet access to a local folder or file share the machine has access to.

    Save-HelpDestinationPath \\fps1.acmelabs.com\resources\PSv3Help

  • We can move the files to a USB Drive or Share  and them from the host that we want to update the help files we specify the –SourcePath and the path to where the files are located

    Update-HelpSourcePath \\fps1.acmelabs.com\resources\PSv3Help

    We can configure a scheduled task to update each day the PowerShell help files either from the internet or from a share as in the example above:

    Register-ScheduledJob -Name UpdatePSHelp `

    -ScheduledJobOption @{RunElevated=$true} ` -ScriptBlock {Update-Help -Force -Verbose} ` -Trigger @{At='6:00 AM';Frequency='Daily'}

    We can take a look at the output of the scheduled jobs with:

    Get-Job -Name UpdateHelp | Receive-Job 

    Now if you are using PowerShell v2 and you also want the latest help information you can use the –Online parameter and this will open Internet Explorer to the page with the latest information you requested.

    Using Get-Help

    We use the Get-Help cmdlet displays information about Windows PowerShell concepts and commands, including cmdlets, functions, CIM commands, workflows, providers, aliases and scripts.

    The cmdlet has also an Aliases set in the shell by default as help and man. It can be used in either of two ways, the first one to search for help information across the entire help with the use of wildcards. help <wildcard expression> will look for the word or expression in the titles of the help files, if none is found it will look in the content of the help for it. We can also limit to what type of information we may want with the –Category parameter

      help -Category Cmdlet -Name *service*

    The cmdlet can also be ran against a specific cmdlets, functions, CIM commands, workflows, providers, aliases or scripts. Wen used against a cmdlet with no options it will show Name, Synopsis, Syntax, Description, Related Links and Remarks. One can select what parts of a help file we want to see by specifying the parameter for the level of information one wants

    • –Detailed parameter is given it will show Parameter information and Examples.
    •  –Full parameter is given it will show a more detailed list of info for Parameters.
    • –Examples parameter is given only examples are shown.

    A cmdlet can have more than one way for it to be invoked and this can be seen in the syntax. They will typically have one or more Parameter Sets that will differ from syntax to syntax.

    image

    The parameters can be read as:

    • Required for required options or values they will not be enclosed in any bracket.
    • Options or values enclosed in [ ] are optional
    • Values are represent with the type they take between < >
    • Those values that can be lists are represented as <type[ ]> 
    • Those that have a predefined list of options it can take are represented as < option1 | option2 | option3>

    When the help cmdlet is used with the -full option is used we get additional information on the parameters:

    • required? - specifies if the option is required or not.
    • position? - specified if the position is a named one or an order one. For ordered one it will give the number of the position for the value it will map to it.
    • Default value - Default value the option has. (Some times on PSv2 it does not display properly)
    • Accept pipeline input? - specified if the option accepts input from the pipeline and if the input is by value type or by property name.
    • Accept Wildcard Characters? - specifies if wildcard characters can be used.

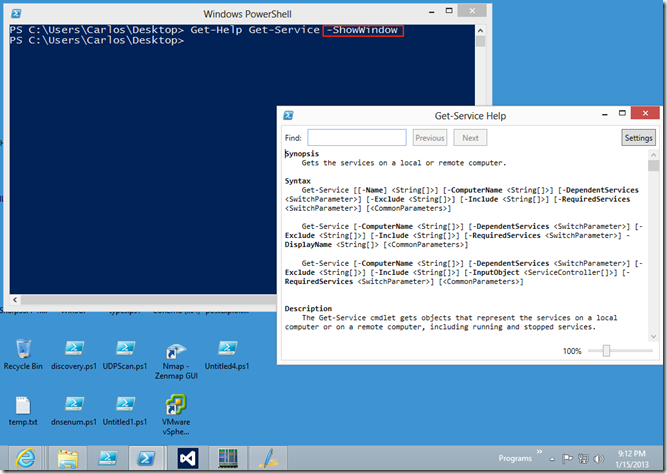
    With PowerShell v3 the –ShowWindow parameter was added to open a separate window that can be used as reference while one works construction a command

    image

    Conceptual Help Topics

    PowerShell contains what is called Conceptual help topics that contains detailed information about several subjects and areas of Powershell. These can be found at  http://technet.microsoft.com/en-us/library/jj583016 or from the PowerShell console just run

    help about 

    This will list all conceptual topics.

    image

    Conclusion

    I invite you to run help against the command shown here and explore the conceptual help topics. Hope you find the blog post useful.

  • Centralized Management of Java SE Environment Using GPO (Redux)

    My Adventures helping a friend secure his Java environment where fun, in my original blog post I used GPO to reduce the risk in his environment by crudely pushing  a configuration file to his environment. After 24 hours the fun started because we got insight from the support team, developer and users and came with a game plan.

    The requirements:

    • Solution must provide the ability to configure Java 7 and Java 6.
    • Users must still be able to look at the settings in the Java control panel so they can relay information to helpdesk for troubleshooting.
    • The configuration files must be in a place where the can be replicated to Domain Controllers in other locations.
    • Solution must work on Windows Versions 5.x and 6.x
    • Policy Should only apply and create the files for machines with Java installed.
    • Policy should be robust enough to adapt is Java 6 or 7 are installed on the target in the case a computer is moved from one OU (Organizational Unit) to another.

    Thankfully we worked and came with a much simple and easier to manage solution that made everyone happy (And me never volunteering to help).

    Creating WMI Filter

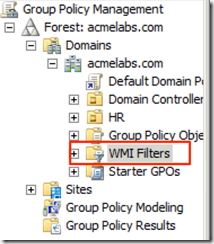
    When it comes to applying Group Policy Objects I find that WMI filters is one of the best ways to determining to what machines to apply a policy and to witch not. We start by creating 2 WMI filters one for Java 6 and another for Java 7. We first go in to Group Policy Management Console, and go in to WMI Filters:

    image

    We Right-Click on it and select New

    image

    We give it a name of Java SE 7 is Installed and a description of “For Policies that will only apply for hosts running Java SE 7” and we Click on Add to include our WMI WQL Query and we add the query

    Select * From win32_Directory where (name="c:\\Program Files\\Java\\jre7" or name="c:\\Program Files (x86)\\Java\\jre7")

    This WMI Query will look for bot X64 and X86 locations of the JRE7 Folder on the System and if found it will apply the policy.

    image

    We click on Save to save the query.

    We would do the same for Java SE 6 if we want to cover it.

    Creating Policy Files

    Next we create policy files for Java in our domains \\FQDN\SYSVOL\FQDN\JavaPolicy folder where FQDN is the full path of your domain name. In my example I will create to folders one called JRE7Strict that will have restrictive settings and another called JRE7Block that will have the files to block Java on all web browsers.:

    image

    In Jave SE a deployment.config file is used for specifying the System-Level deployment.properties for use by all users of the system and it is located in %windir%\Sun\Java\Deployment\deployment.config. By default no deployment.config  or folder structure exists. The deployment.config file needs the option of deployment.system.config and it can point to a URL(HTTP or HTTPS) or a File Path that points to the deployment.properties to load, to ensure that the properties file in the user %APDATA% location is not loaded we set the deployment.system.config.mandatory option with a value of true. Our config file for the restricted settings would be:

    deployment.system.config=file\://acmelabs.com/SYSVOL/acmelabs.com/JavaPolicy/JRE7Strict/deployment.properties
    deployment.system.config.mandatory=true

    and we would place the file in the JRE7Strict folder and we would create our Properties file with the options we want and to lock the options so they still show in the control panel but would be greyed out so they can not be modified we would also add a <property>.locked line. A sample restricted properties file would look like:

    deployment.security.level=VERY_HIGH deployment.security.level.locked deployment.security.askgrantdialog.notinca=false deployment.security.askgrantdialog.notinca.locked deployment.security.notinca.warning=true deployment.security.notinca.warning.locked

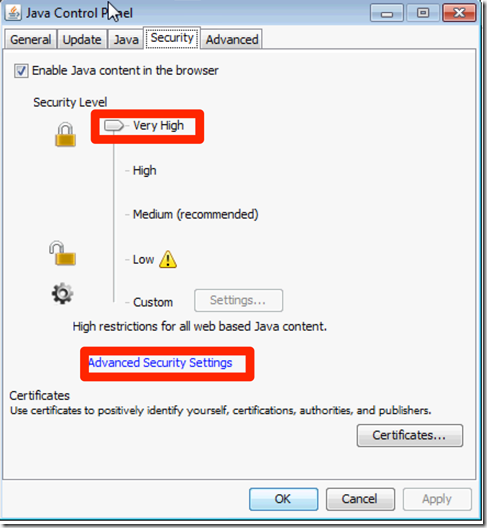
    In the example I set the Security Level to Very High and locked it as well as other options.

    Update: for more information on the security levels and what they restrict take a look at http://docs.oracle.com/javase/7/docs/technotes/guides/jweb/client-security.html Remember security levels where added in version 7 Update 10. The only whitelisting available is for sites that use signed Java Applets, those that do not will be blocked by the Very High security level, if you need access to unsigned Java Applets and are not able to sign and create a whitelist of signed ones set the setting to High and educate your users or Restrict them to Internet Explorer only and set security zones and settings per zone and site http://blogs.msdn.com/b/ieinternals/archive/2011/05/15/controlling-java-in-internet-explorer.aspx?Redirected=true.

    As domain admins we would save the files in the folder:

    image

    for a policy that would block Java on all the web browser we would only add to the properties file:

    deployment.webjava.enabled=false
    deployment.webjava.enabled.locked


    Creating the Policy

    The use of the centralized files it makes creating a policy file it is more simple. We just create a new GPO and we start by setting the creation of the folder where the config file will be placed so in the Policy we would go in to Computer Configuration –> Preferences –> Windows Settings –> Folders:

    image 

    We create a new entry for the creation of the folder %WinDir%\Sun\Java\Deployment

    image

    Now we can create an entry for copying the config file to the folde we go to Computer Configuration –> Preferences –> Windows Settings –> Files:

    image

    We now create a new file policy and set it to replace so updating only takes modifying the file it self we set  the Action to Replace so when the file is updated it will be sent to all the machines in the domain when they update their policy, we set the Source to  \\FQDN\SYSVOL\FQDN\JavaPolicy\JRE7Strict\deployment.config and the Destination to %windir%\Sun\Java\Deployment\deployment.config:

    image

    Before we link the policy to any OU we must set the WMI filter we created so it will only create the folder and file on machines running the correct version of JRE

    image

    Once it is done we can link it to the OU we want the policy to apply to. Once a hosts update it’s policy via schedule or it is forced.

    If you are running a Windows 2012 DC I recommend you go in to the Starter GPO’s and have the 2012 DC create them if they have not yet, if they have been already created and they where in a Windows 2008 or Windows 2008 R2 back the Starter GPOs, Delete the starter GPO folder from \\FQDN\SYSVOL\FQDN\, go back to the Group Policy Management Console on Windows 2012 and have it generate them, you should have 2 additional GPO templates for Firewall and Management configuration. From PowerShell (Had to sneak some PowerShell in Smile with tongue out) run:

    New-GPO –Name "Configure firewall rules for remote gpupdate" –StarterGpoName "Group Policy Remote Update Firewall Ports" | New-GPLink –target "dc=acmelabs,dc=com" –LinkEnabled yes 

    This will create a New Group Policy and link it to the Domain (Make sure you modify the DC values to the ones of your domain) that will allow you to force GPO updates against the host in the domain once the policy is applied.

    To force a update of the policy from your Windows 2012 DC run Invoke-GPUpdate against the machines you want to update, in this example I’m running it against the HR OU where my test VM’s are in my lab:

      Get-ADComputer –filter * -Searchbase "ou=HR, dc=acmelabs,dc=com" | foreach{ Invoke-GPUpdate –computer $_.name -force} 

    Once the policy has been updated we can just open the Java Control Panel and confirm the options have been set and that they are greyed out.

    image

    If the user tries to load a self-signed applet or one not in your trusted signature file he will get:

    image

    If the Applet is validly signed he will get a popup giving him a warning and allowing him to run run the applet:

    image

    This method can be used to set other policies like the path for the trusted signatures and PKI files plus settings. So make sure your applets are properly signed with valid certificate and modify your trusted CA file to only trust your vendor to reduce the risk of the attacker using a valid provider or even better use your own CA and signed your applets with your own cert.

    For Java 7 properties reference use http://docs.oracle.com/javase/7/docs/technotes/guides/deployment/deployment-guide/properties.html

    For Java 6 properties reference use http://docs.oracle.com/javase/6/docs/technotes/guides/deployment/deployment-guide/properties.html

    Hope you find this useful and allow you to secure your Java environment in Windows.

    Pushing Security Configuration for Java 7 Update 10 via GPO

    NOTE: Please use the following blog post with improved solution /blog/2013/1/14/centralized-management-of-java-se-environment-using-gpo-redu.html

    A friend of mine that work on a local government agency called me quite concerned about the new Java Exploit that surfaced this month for Java 7u10, specially since he a lot of his CRM and HR systems depend on Java being Up and Running for the Oracle Solution he uses at work. He has always been quite concerned about the security of his hosts pushing Microsoft EMET on his windows boxes, Running the latest version of Java and uninstalling the old ones, having his machines up to date in patches and just all around good administration. He asked me if I could help him out find a way to force security to Very High on the the Java configuration and deploy it to all of his Windows 7 machines, so I took it as a challenged and the good guy in me said I would do it for free…. has this been a long afternoon of testing but finally got it.

    JavaSE 1.7 update 10 allows for the configuration of its setting via a file called deployment.properties that can either reside in the user %APPDATA% folder under Sun\Java\Deployment or as a System Wide Setting under %WINDIR% folder under Sun\Java\Deployment so I took it to come up with a GPO Object for him that I could use with the settings he wanted to make sure as to mitigate the vulnerability and allow the teams inside his organization to use it while disabling Java to other via other settings.

    The first step is to log in to a machine with Java and in the Java Control Panel configure the security level and in Advanced Settings the additional settings

    image

    image


    This generated for us a file called deployment.properties that we can use as the master file to push to our Windows Clients.  The file is located under %USERPROFILE%\AppData\LocalLow\Sun\Java\Deployment The file is just a simple text file that we can then manipulated and add other entries to it. We now copy this file to a share that is accessible to all machines and that the file is readable to machine accounts in the domains since the connections to the share will be done by them.

    The main lines you will want are:

    deployment.security.askgrantdialog.notinca=false
    deployment.security.level=VERY_HIGH
    This will block none trusted Applets and will prompt the user for automatic applet download. If you want you can create a second one to block Java on all browsers by making sure the file contains:
    deployment.webjava.enabled=false

    On one of our domain controller we open the Group Policy Management administration tool. We right click on the Group Policy Objects node in the right side and select New in the menu

    image

    We give it a descriptive name

    image

    We Right-Click on the newly created Policy and choose Edit from the menu

    image

    We now navigate to Computer Configuration –> Preferences –> Windows Settings –> Files

    image

    We select the Action of Create, put in the Source File the file in the share accessible to all the machines and in Destination %WINDIR%\Sun\Java\Deployment\deployment.properties

    image

    We create another file entry with the Action of Delete an the Destination of %USERPROFILE%\Sun\Java\Deployment\deployment.properties  this is to ensure that the Users copy does not go above the System Wide one since a user preference will override the systems.  This one we Create it under the User Configuration node

    image

    image

    We now do one last entry under Folders so as to make sure the folder is created for the configuration file since if it is not the file is not copied.

    image

    Now that it is done we can close the edit window and attach the policy to the OU where the users we want to keep using Java but with higher security settings are, we do this by Right-Clicking on the OU we want to apply the policy against and choose to link an existing one

    image

    From the list we select the one we created

    image

    Once Linked next time the GPO refreshes the policy should apply and settings should be set. Do test in your own environment and adjust these steps as needed, remember one can use WMI Filters, and different standards may apply, this is just one of many ways for a certain scenario but still hope you find the information useful. For more information on the file format and details look at http://docs.oracle.com/javase/7/docs/technotes/guides/deployment/deployment-guide/properties.html

    Update:

    For those asking how it impacts the levels with the vulnerability trying to execute here are how the Medium, High and Very High security levels mitigate the vulnerability.

    With Security Level at Medium

    image

    Should I say more?

    With the Security Level at High

    image

    This would be the case if you have not set trust for the internal application you run and will require some user training and awareness chats since they can just hit run and the exploit will execute.

    With the Security Level at Very High

    image

    One can go even further and have a network location or use the same method to specify trusted certificate lists and manage all the Certificate settings, for this you can take a look at http://docs.oracle.com/javase/7/docs/technotes/guides/deployment/deployment-guide/jcp.html#security

    Another thing to keep in mind is to block access to the user to the Java Control Panel so as to prevent them from reducing the security levels. You will have to do this from a machine with Java installed so I recommend a Windows 7 or 8 Machine in the domain with the RSAT tools installed.

    image

    Set the Proper permissions for the user group you want to restrict, in the example I use the local Users group as an example, make sure your admin account is not under the group you decide to use Smile since the most restrictive permission will apply first, here it is only as an example not the recommended setting since your environment will vary.


    image

    Make sure it is set to replace the permissions:

    image

    This settings will apply to a x64 system, make sure to also add a path for x86 system to then file or create a separate policy for those and use WMI Filters ass needed.

    Now after the policy has been updated and user tries to to access the control panel shortcut to modify the settings he should get:

    image

    The file permissions can also be used to block users from creating and reading the %USERPROFILE%\AppData\LocalLow\Sun\Java\Deployment\deployment.properties  file on Windows Vista and higher versions of Windows and %USERPROFILE%\AppData\Sun\Java\Deployment\deployment.properties on Windows XP and 2003 systems.

    Set PowerShell as Your Default Shell in Windows 2012 Core

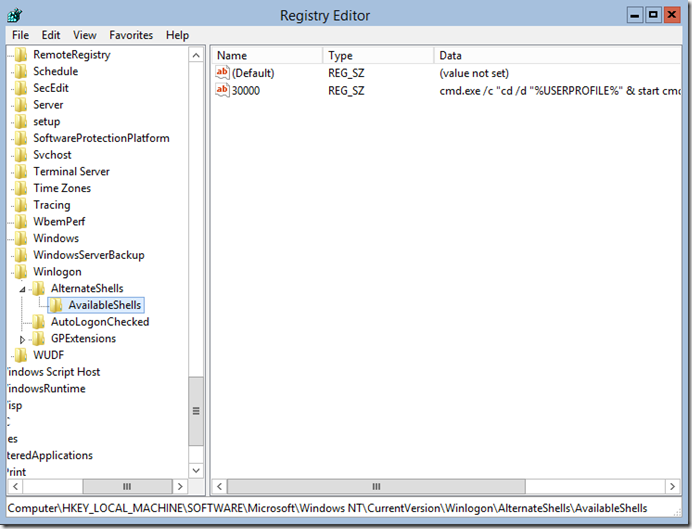
    One thing I do hate in the new Windows 2012 Core setup is that PowerShell is not the default shell when one logs in. Microsoft made it so that in Core most of the Administration task are done via PowerShell or Remote Administratio tools. The fist thing one must do is to take ownership of the HKLM\SOFTWARE\Microsoft\Windows NT\CurrentVersion\Winlogon\AlternateShells\AvailableShells Registry key since we will be modifying it. To achieve this Microsoft was nice enough to include the GUI version of the registry editor so we only need to type regedit in the command prompt and hit enter, after it comes up we can navigate to the key image We right-click on the Key AvailableShells and click on Permission, on Permissions click on Advanced and click on Change image Add the Administrator account, click on OK and on the previous screen click on Apply. Create a registry value under the key with the name of 40000 and set the value to:

    powershell.exe -noexit -command "& {set-location $env:userprofile; clear-host}"


    image

    Now when you log off and log back in you will be greeted with a PowerShell window.

    image

    The reason why we use 40000 is that when you install the full GUI Explorer.exe will be 90000 and we want to PowerShell to be the Shell only if we are in Core or in Server-Gui-Mgmt-Infra.

    To make life simpler here is a script you can either copy and paste in to a PowerShell window or create a .ps1 file and execute from there:

    # Use C# to leverage the Win32API
    $definition = @"

    using System;

    using System.Runtime.InteropServices;

    namespace Win32Api

    {

    public class NtDll

    {

    [DllImport("ntdll.dll", EntryPoint="RtlAdjustPrivilege")]

    public static extern int RtlAdjustPrivilege(ulong Privilege, bool Enable, bool CurrentThread, ref bool Enabled);

    }

    }

    "@
    Add-Type -TypeDefinition $definition -PassThru
    $bEnabled = $false


    # Enable SeTakeOwnershipPrivilege
    $res = [Win32Api.NtDll]::RtlAdjustPrivilege(9, $true, $false, [ref]$bEnabled)

    # Take ownership of the registry key
    $key = [Microsoft.Win32.Registry]::LocalMachine.OpenSubKey('SOFTWARE\Microsoft\Windows NT\CurrentVersion\Winlogon\AlternateShells', [Microsoft.Win32.RegistryKeyPermissionCheck]::ReadWriteSubTree,[System.Security.AccessControl.RegistryRights]::takeownership)
    $acl = $key.GetAccessControl()
    $acl.SetOwner([System.Security.Principal.NTAccount]"Administrators")


    # Set Full Control for Administrators
    $rule = New-Object System.Security.AccessControl.RegistryAccessRule("Administrators","FullControl", "Allow")
    $acl.AddAccessRule($rule)
    [void]$key.SetAccessControl($acl)


    # Create Registry Value
    [void][Microsoft.Win32.Registry]::SetValue($key,"90000",'powershell.exe -noexit -command "& {set-location $env:userprofile; clear-host}"')

    I hope you found the blog post information useful.

    Windows 2012 Server Different GUI Levels

    I do have to say after using Windows 2012 server for a while in my lab and to host several Hyper-V machines for research and testing I do have to say I like it. It is a lot less resource intensive that Windows 2008 and Windows 2008 R2 are, the use of WinRM for Remote Management and the Server Manager interface makes administrating several servers a breeze, the best part of all is that I can administer the server completely with Windows PowerShell and for those cases that I need the GUI I can install and remove it to save a couple of MB of memory and reduce the attack surface of the box. 

    The main reason that the GUI can be modified is that the components for it are now features of the OS:

    • Graphical Management Tools and Infrastructure (Server-Gui-Mgmt-Infra):  provides a minimal server interface and server management tools. The components for it are:
      • Server Manager
      • Microsoft Management Console (MMC) and snap-ins
      • Subset of Control Panel
    • Server Graphical Shell (Server-Gui-Shell): it  is dependent on the first feature and provides the rest of the GUI experience. The component of it are:
      • Desktop
      • Start screen
      • Windows Explorer
      • Internet Explorer

    In he blog post I will cover how to use PowerShell for adding and removing of the features since PowerShell is available in server core with none of the components installed.

    Here is Windows 2012 Server Core default install after logging on as administrator:

    default_desktop

    The terminal it provides is cmd.exe so to get to Windows PowerShell we need to type powershell and press enter.  In PowerShell we can use the Windows Feature functions to add and remove features. To list them we can use the Get-Command cmdlet:

    PS C:\Users\Administrator> Get-Command *windowsfeature* -Type function,cmdlet
    
    CommandType     Name                                               ModuleName
    -----------     ----                                               ----------
    Function        Get-WindowsFeature                                 ServerManager
    Function        Install-WindowsFeature                             ServerManager
    Function        Uninstall-WindowsFeature                           ServerManager

    We find that we can get the Windows Features currently installed on the system, we can Install and Uninstall Windows Features also. to get a list of the options and examples of use for each we can use Get-Help cmdlet with the –Full paramter:

    Get-Help Install-WindowsFeature -Full

    Lets start by installing only the Graphical Management Tools and Infrastructure (Server-Gui-Mgmt-Infra), this will give us the tools for only managing the server but not for browsing the web or doing some activities that might cause the server to fall for a client side attack.  To install we just use the Install-WindowsFeature function and give it the parameter to restart the server after it is installed:

    Install-WindowsFeature Server-Gui-Mgmt-Infra –Restart

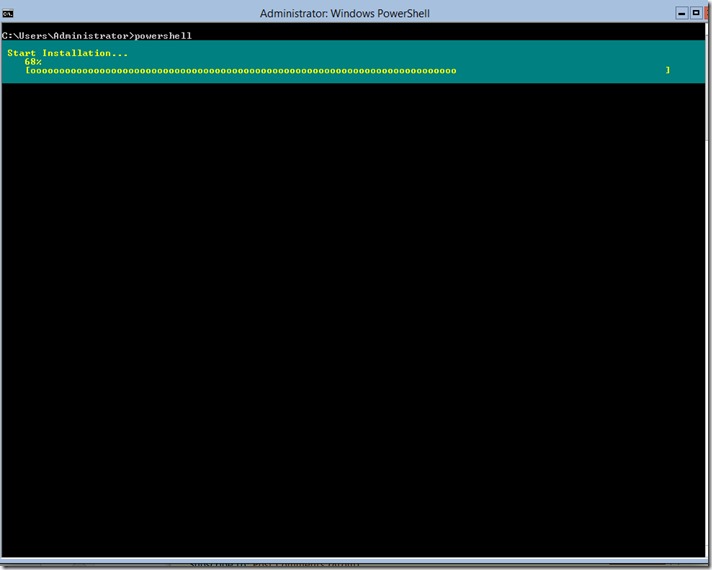
    Once it is ran PowerShell will show the progress of the installation:

    mgmt-infra-install

    Once the server starts and one logs on we can see that. Once the server reboots and one logs one Server Manager will come up automatically and can be used for management tasks.

    mgmt-infra-install2

    If we want the full desktop experience and the addition of Internet Explorer we just need to run the following command to add that component:

    Install-WindowsFeature Server-Gui-Shell –Restart

    One shortcut to install all if you are in Core enumerate the features with the word GUI and since PowerShell is an Object Based shell we can pass the objects it returns to the Install-WindowsFeture function to install those:

    Get-WindowsFeature *gui* | Install-WindowsFeature -Restart

    Once the server reboots and the user logs in they should have a full GUI experience:

    server-gui-shell

    One thing to take in to account on this system with no GUI as a Core only server default install memory use was around 322MB of memory, with the Infrastructure Management Tool support only it was around 436MB of memory and with the full GUI Experience it was around 527MB of memory. I would recommend only having Server-Gui-Mgmt-Infra installed as a mid point of usability and reduces attack surface on the server.

    I hope you found the information on the blog post useful.